
Live Camera Feed
TouchDRO can show live video from a UVC camera or microscope in the graphical view, with a crosshair drawn over the image and the position readout beside it. This provides a way to locate part features by eye: hole centers, scribed lines, and edges that are too small, too delicate, or too damaged to pick up by touch. A touch probe triggers on whatever is proud of the surface. With a camera you can see exactly what you are aiming at.
Some of these features can't be picked up by touch at all. An edge finder or probe can't find a scribed layout line or a center-punch mark, and a hole smaller than the probe tip is out of reach entirely. With the camera, you park the crosshairs on the feature and read its position straight off the scales. For example, you can lay a part out with a scribe and a height gauge, then machine to those lines with DRO precision.
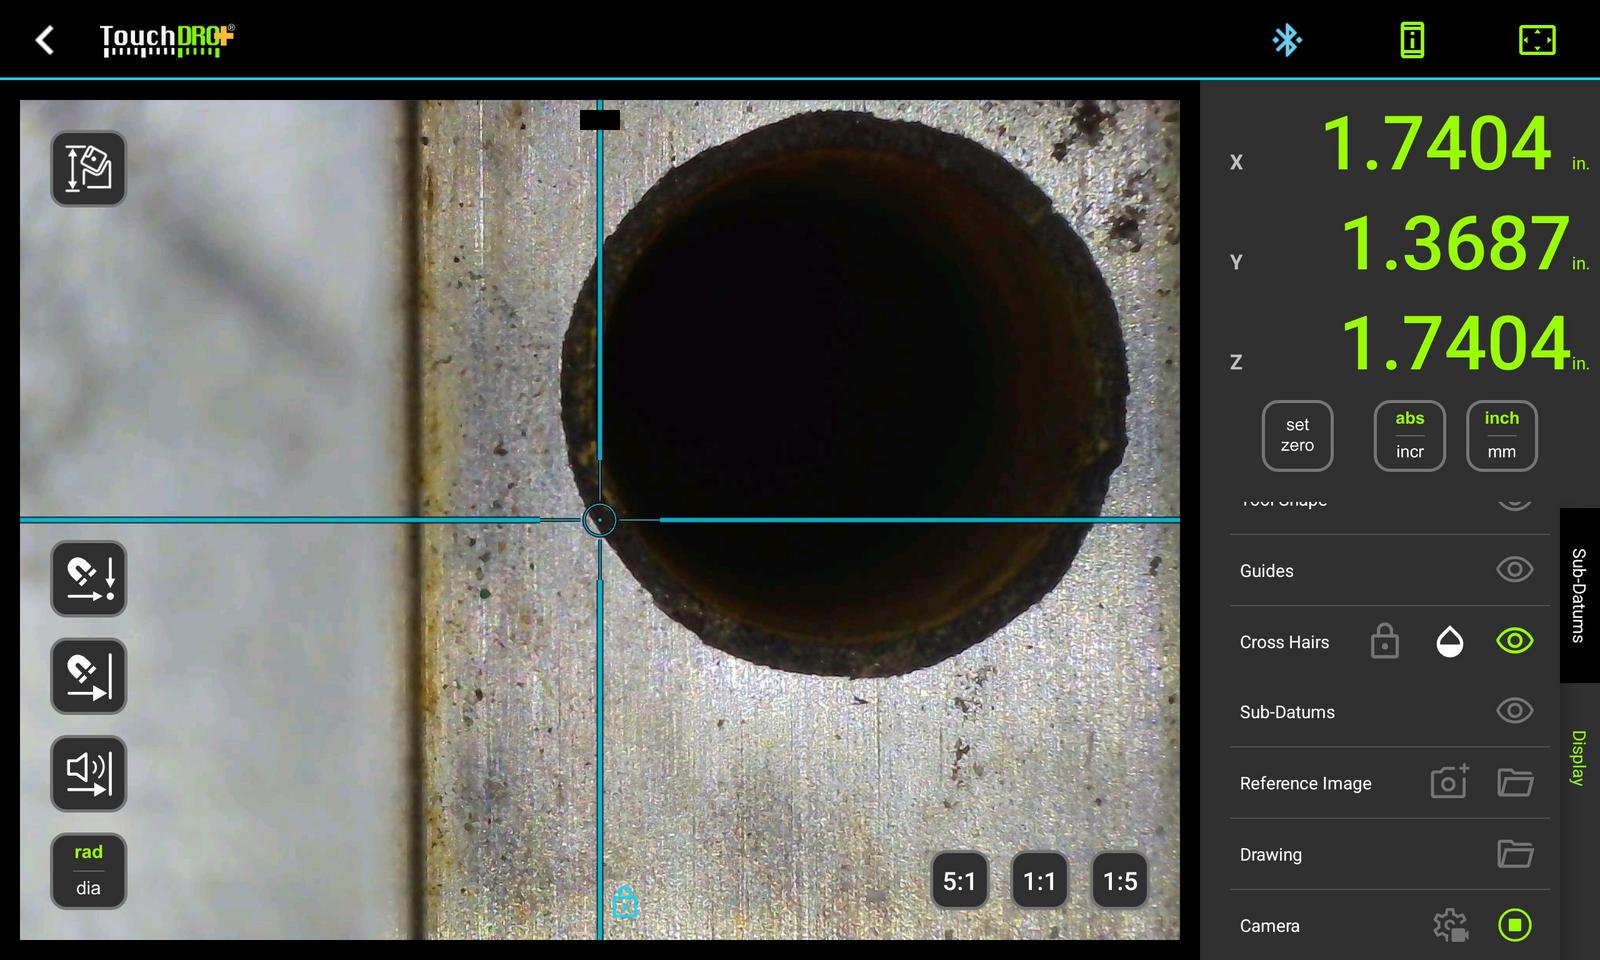
TouchDRO shows the video in place of the graphical workspace, and overlays such as drawings, guides, and stored coordinates are not scaled to the video image. In other words, the camera view is a centering and inspection tool. To work against a drawing, switch back to the graphical workspace. You can move between the two at any time.
Setting the camera up for the first time takes a few minutes, and the sections below cover each step in detail:
- Connect the camera to the tablet through a powered USB hub.
- Allow the Android prompt, with the "Always" option checked.
- In the "Camera Setup" dialog, test a video mode and save it.
- Create a probe profile for the camera and capture its offsets.
- Press play on the "Camera" row of the "Display" panel.
Connecting the Camera
TouchDRO works with UVC cameras: the kind that work on Linux, Android, or a Mac without a special application. The "Recommended Microscopes and Cameras for Milling Machines" page lists the models we have tested. Connect the camera through a powered USB hub. Many of these cameras are not detected when plugged straight into the tablet's USB-C port, and the "Turning a Manual Mill into a Measuring Microscope" guide covers the physical setup.
The first time a camera is plugged in, Android will ask whether to open TouchDRO for it. Check the "Always open TouchDRO..." option before tapping "OK". Android revokes a camera's USB permission every time the camera is unplugged, and without the "Always" answer the question comes back on every replug.
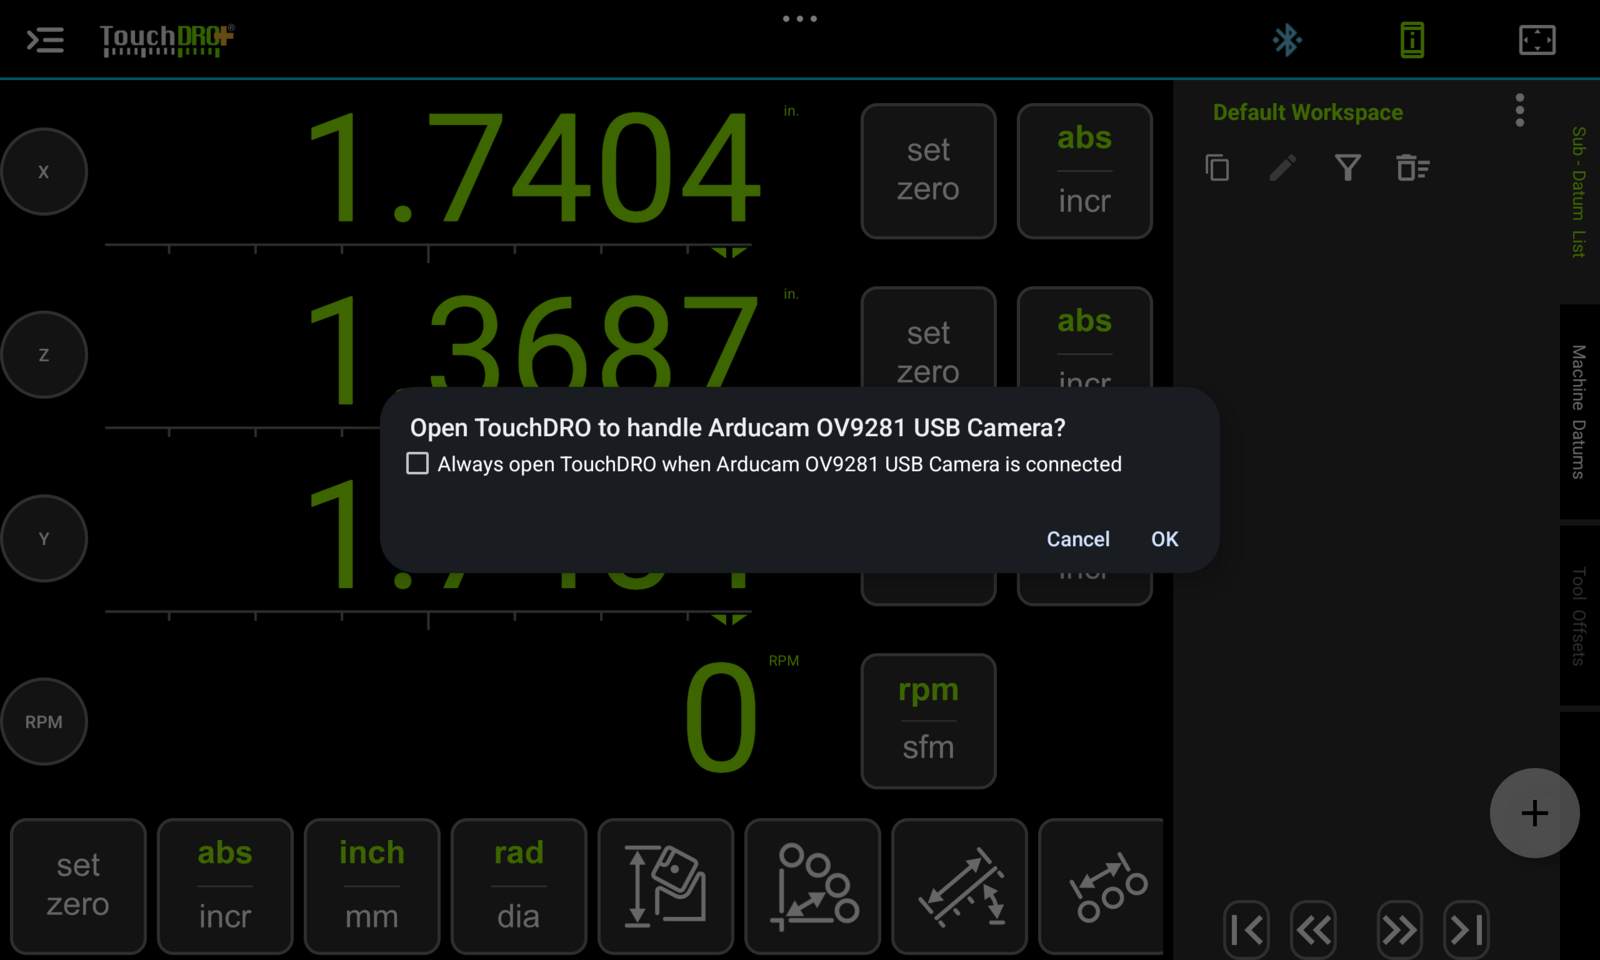
Some cameras have a built-in microphone, and for those the permission prompt will warn that TouchDRO could capture audio through the device. TouchDRO has no audio-recording permission and can't record anything, so the warning is safe to accept.
Setting Up the Camera
Many cameras advertise video modes they can't actually deliver. Such a mode will produce a black image, or no frames at all, and the spec sheet is no help in predicting which ones work. TouchDRO handles this with a mandatory test: a mode can't be saved until TouchDRO has watched it deliver video on your tablet.
To open the "Camera Setup" dialog, tap the settings icon on the "Camera" row of the "Display" panel. The row is greyed out when no camera is plugged in, and setup opens only while the video is stopped, so stop the feed first.
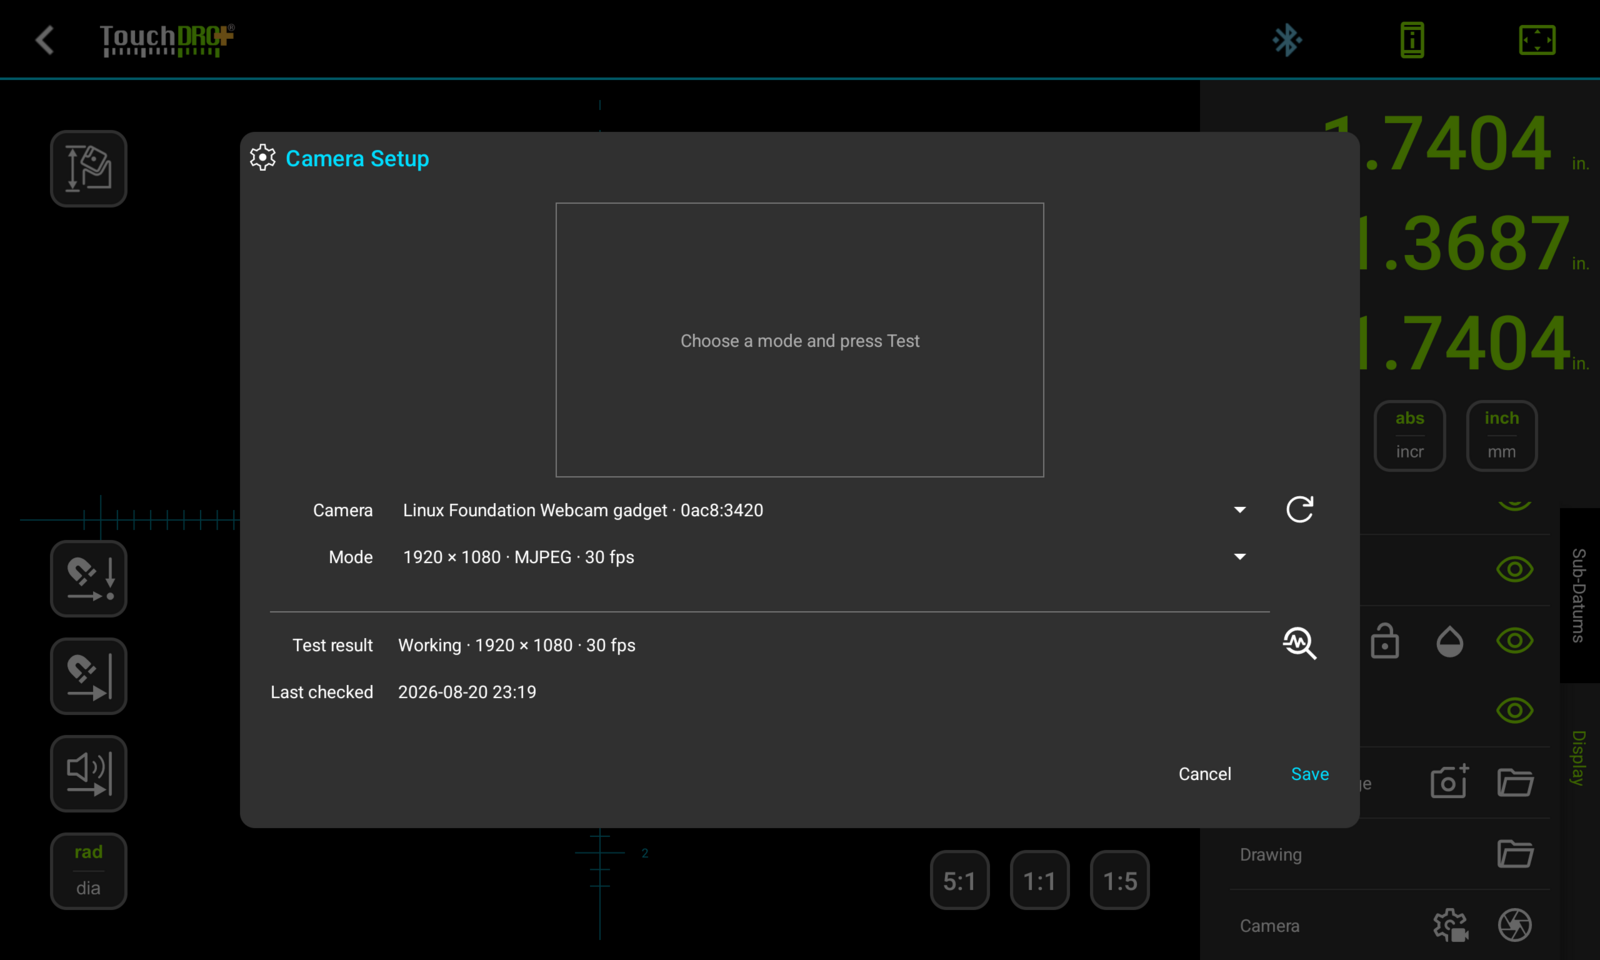
- The "Camera" dropdown lists the attached cameras by name and USB id. TouchDRO reads the list once, when the dialog opens. To pick up a camera you plugged in later, tap the refresh button next to the dropdown.
- The "Mode" dropdown lists the video modes the selected camera claims to support: resolution, encoding, and frame rate. A mode shown in bold has already worked on this tablet, and its frame rate is the measured one rather than the camera's claim. A struck-through mode was tried here and failed. Plain modes have not been tested yet.
- "Test result" and "Last checked" show how the selected mode behaved the last time it ran, whether from a test or from the play button.
To test a mode, point the camera at a real part, in focus, and tap the test button next to the "Test result" row. TouchDRO will run the stream for about ten seconds, show the live picture in the preview, and record the result along with the measured frame rate. Note that testing against an empty bench can over-promise. A nearly blank image compresses to almost nothing, so a marginal mode can look fine until there is real detail in the frame.
"Save" stays disabled until the selected mode has been tested and delivered video. A mode that has already proven itself needs no second test, so for a camera TouchDRO has seen before, the dialog opens ready to save.
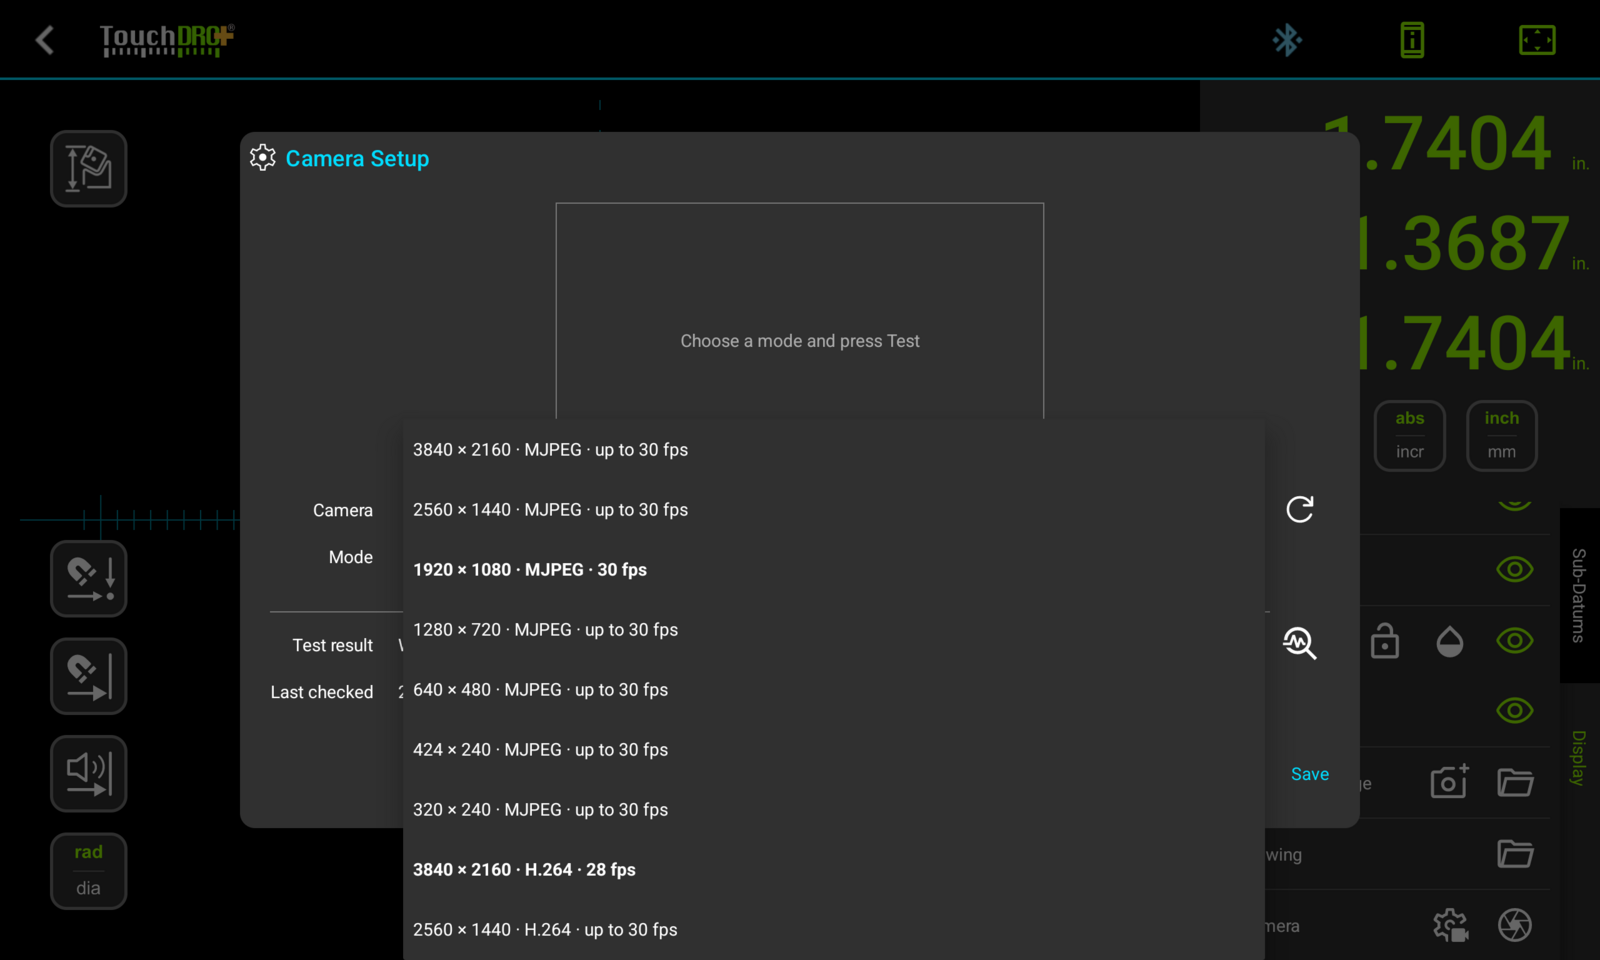
On most tablets, 1080p MJPEG is a good starting point. On older tablets, you may need to drop to 720p. To judge a mode, start the video, crank the table, and see whether the lag bothers you. Centering accuracy comes from the optics and the mount, not from pixel count, so a smaller image costs you nothing in practice.
The encoding matters as much as the resolution. MJPEG sends every frame as a complete picture, so it decodes with very little lag, and a dropped frame costs only that frame. Listings sometimes write it as MJPG, or loosely as "MPEG". Sellers usually mean the same thing.
H.264 compresses harder and can run faster on modern tablets, but most of its frames carry only the changes from the previous one. There is usually a bit more lag, and lost data costs every frame up to the next complete picture, so a glitch can drop a fraction of a second of video. Uncompressed video is the fastest to decode, but it takes the most USB bandwidth, and USB 2.0 can't keep up. Many inexpensive cameras advertised as USB 3 are USB 2 in reality, so uncompressed is rarely the best choice.
The saved choice is stored for the current machine profile, and each camera keeps its own saved mode, so two machines (or two different scopes on one machine) each keep their own setting. When you press play, TouchDRO will start the camera you saved most recently. If that camera is missing, TouchDRO will fall back to another camera it has a saved mode for.
The Camera Profile
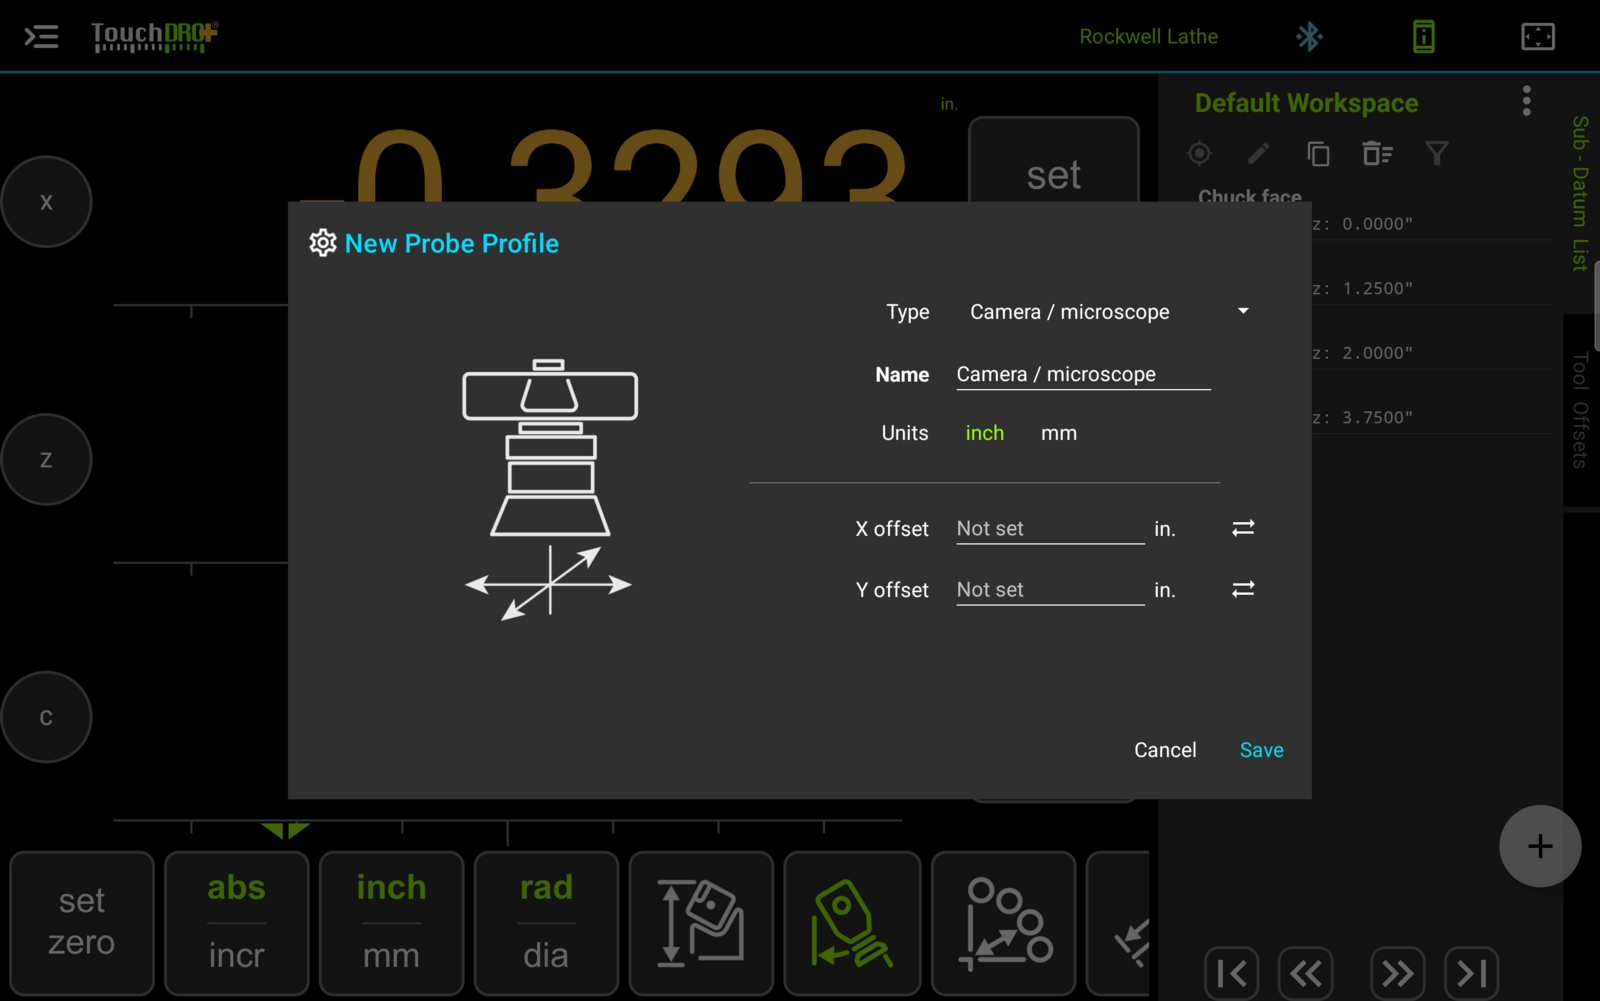
The "Camera Setup" dialog covered the video side. TouchDRO also needs to know where the camera is looking in relation to the spindle axis. To store that offset, you create a profile for the camera in the "Probe Library", just like for a touch probe. The profile holds the offset between the crosshair and the spindle, and TouchDRO will apply it to every coordinate you capture.
The profile type for a camera is "Camera / microscope". Rather than measuring the offsets and typing them in, the sync buttons next to "X offset" and "Y offset" will take the current axis readings, so the offsets can be captured in place. The full procedure is described in the "Turning a Manual Mill into a Measuring Microscope" guide, and the individual fields on the "Probe Profiles" page.
Using the Live Feed
To start the video, tap the play button on the "Camera" row of the "Display" panel. The same button stops it. The play button stays disabled until a camera has been set up for the current machine profile, and TouchDRO never starts the video on its own: not when a camera is plugged in, and not on the next launch after the app restarts.
While the camera is live, TouchDRO fills the whole layout area with the video. The image is scaled proportionally and cropped at the edges rather than shrunk to fit, so you do not see the camera's full field of view. The crosshairs sit at the center of the image, and nothing is lost for centering. Cameras with a 4:3 sensor lose more of the edges than 16:9 ones.
While the video is showing, the crosshairs are locked to the center of the image and can't be panned. The small lock icon at the bottom edge of the video is a reminder of this state, and the lock on the "Crosshairs" row of the "Display" panel is disabled until the video stops. TouchDRO will put the lock back the way it was when you stop the camera.
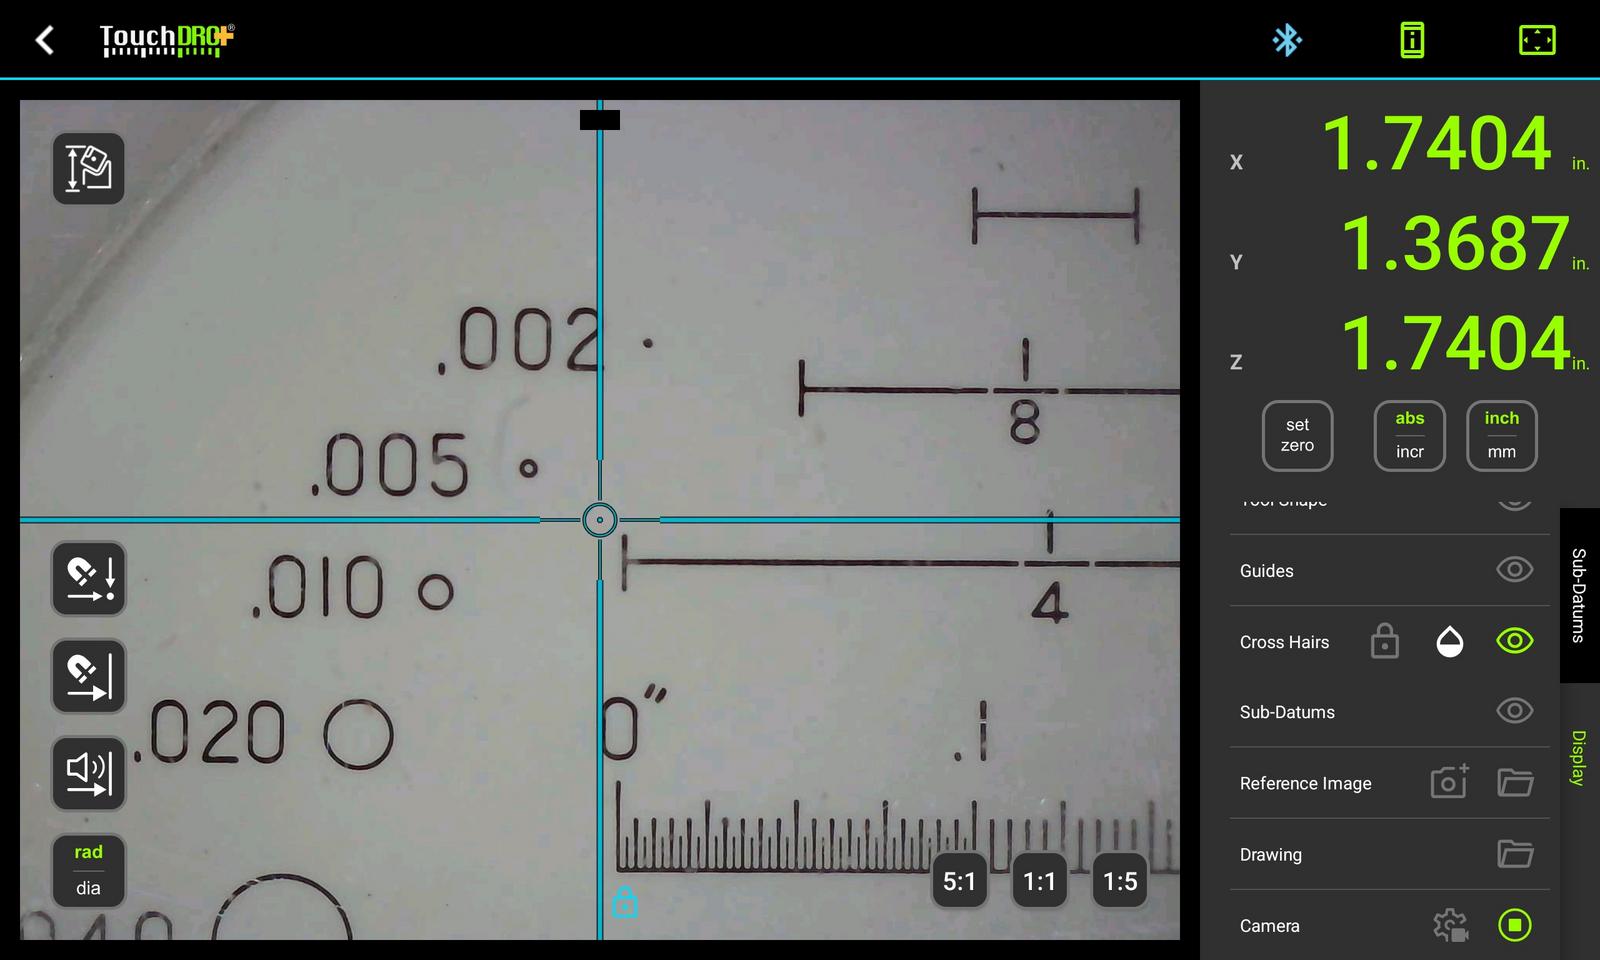
The crosshairs also change shape over the video. A thin line of a single color gets lost against swarf, wood grain, or shiny metal, regardless of the color. Over video, TouchDRO draws heavy bars toward the edges of the screen, so the crosshairs are easy to find, and thin lines with a ring and a small dot in the middle, which is the part you aim with. Every line has a contrasting outline, so it stays visible over light and dark areas alike. The graduations along the crosshairs are left out, since the video image is not to scale. If the default color doesn't stand out on your parts, you can change it with the "Crosshair color when camera is on" setting in the "User Interface Settings".
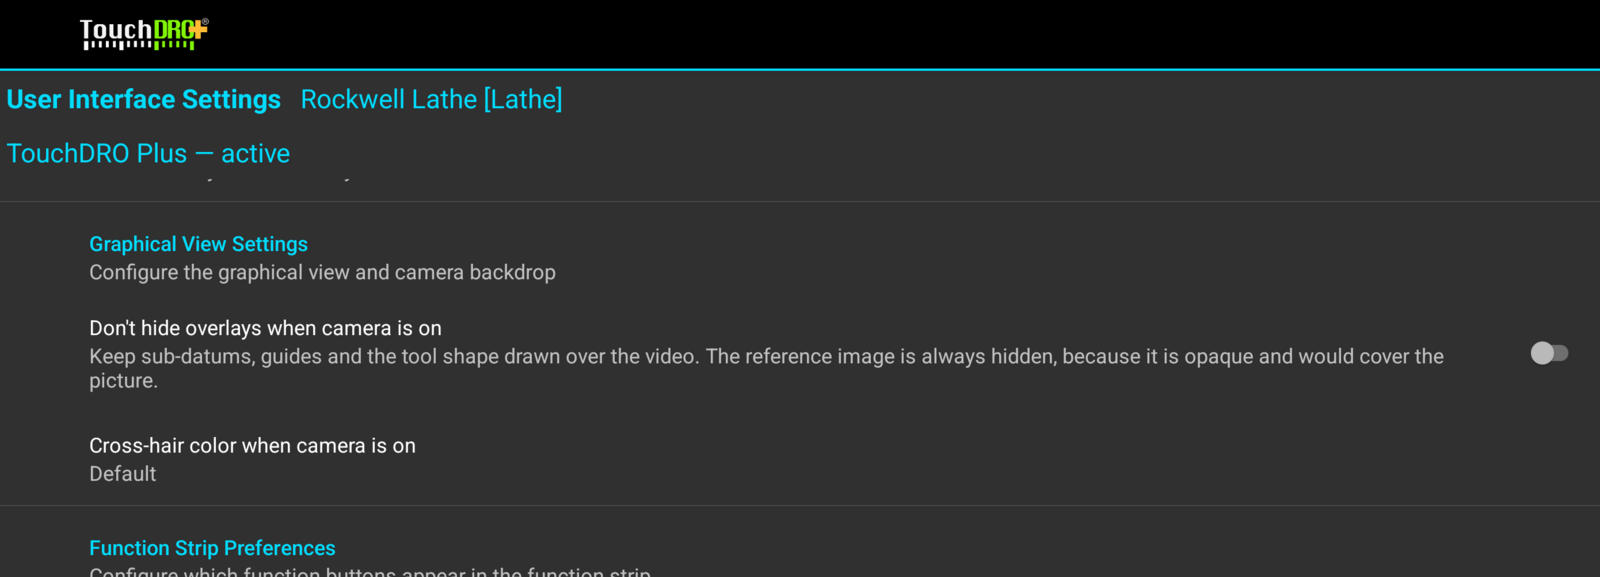
When the video starts, TouchDRO will hide the other display layers and keep only the crosshairs. The camera image is not calibrated to the DRO's coordinate frame, so a drawing or a stored coordinate drawn over the video would sit in the wrong place on the screen. To keep the sub-datums, guides, and tool shape drawn over the video anyway, enable "Don't hide overlays when camera is on" in the "User Interface Settings". The reference image is always hidden, since it is opaque and would cover the picture.
The camera is a sighting aid, and it never captures a position by itself. You crank the machine until the feature sits under the crosshairs, then set the origin or capture the point with the same functions you would use with any other instrument, such as "Indicate Workpiece". The video is also independent of the scale adapter. If the adapter disconnects, the picture stays up, and only the readouts stop.
Accuracy
While cameras are not common in manual machine shops, industrial metrology relies on them heavily. Video measuring machines, vision systems on CMMs, and optical comparators all locate part features optically, without touching the part.
In some ways a camera can be more accurate than a touch probe, especially a budget one. A probe's repeatability depends on its trigger mechanism, the approach speed, and the overtravel. A camera depends on none of that: nothing moves, nothing deflects, and there is no tip diameter to compensate. In practice, even an inexpensive USB microscope won't be the limiting factor in your setup.
The position always comes from the DRO scales, and TouchDRO only uses the video for aiming, so what matters is the resolution of your scales, how precisely you can center the crosshairs, and the alignment of the optical axis. At the magnification of a typical USB microscope, one screen pixel covers a few microns of the part, and your eye can place the crosshairs within a pixel or two of an edge. In Fig. 7 below, the camera is pointed at the reticle of an inspection loupe. The 0.002″ circle is plainly visible, and the individual graduations of the scales are easy to tell apart.
The camera does have requirements of its own: line of sight, decent lighting, and an optical axis parallel to the Z travel. Parallax error grows with any tilt.
Note that mount repeatability is a separate question from accuracy. Within one session, a sturdy mount measures just as well whether or not it comes back to the same position after remounting. Repeatability decides whether the stored offsets stay valid between sessions, and the "Turning a Manual Mill into a Measuring Microscope" guide includes a simple way to check it.
Troubleshooting
Camera problems announce themselves: the readings come from the DRO scales, and TouchDRO only uses the video for aiming, so there is no failure that quietly degrades the measurements. Most fixes come down to power, patience, or picking a different mode.
- The "Camera" row is greyed out with a camera plugged in: TouchDRO doesn't see the camera, and the usual cause is power. An underpowered hub can brown out without any error reaching the tablet. Power the hub, then unplug and re-plug the camera. The power check happens once, at plug-in, so after restoring hub power the camera still has to be re-plugged.
- A message that the camera needs a powered hub: the camera was detected but can't be powered up. The fix is the same: power the hub, then unplug and re-plug the camera.
- The camera takes a long time to appear: wait. Some models take tens of seconds to show up, and replugging the camera restarts the wait rather than shortening it.
- A mode shows a black image: if another mode shows a picture, the mode is broken, not your lighting. Pick a different mode.
- The picture lags or stutters: pick a lower resolution mode. This fixes the lag whether the camera or the tablet is the bottleneck, so there is nothing to diagnose.
- A message that the camera stopped sending pictures: check that the camera is still plugged in and the hub still has power.
- A message about memory for USB video transfers: unplug the camera and plug it back in. If it keeps happening, restart the tablet.
- The permission prompt comes back on every replug: the "Always" answer didn't stick. If TouchDRO is pinned to the screen with Android's screen pinning, unpin it. Android blocks the mechanism that collects the permission while an app is pinned. If a different app opens when the camera is plugged in, that app has claimed the camera; clear its defaults in the Android settings.