
Machine Profiles
TouchDRO can store any number of machine profiles and switch between them. This lets one tablet run several machines, and it lets several people share a machine while each keeps their own preferences and their own work in progress.
A machine profile is close to a complete snapshot of the application. It holds your display preferences, connection settings, workspaces and their sub-datums, the tool library, probe profiles, and the state you were working in when you last used it. Switching to a different profile swaps all of that at once.
What a Machine Profile Holds
A machine profile holds preferences that determine what the DRO shows and how it behaves. Those preferences are independent of the adapter profile, which holds the adapter-specific settings and calibration.
The split follows what each one knows. The adapter knows the scales: how many counts each one produces per inch of travel, and which way it counts. The machine profile knows the machine: which scale feeds which readout, what the readouts are called, and which functions the screen offers. Two profiles can share one adapter, and one machine can have several profiles.
A machine profile holds:
- Display and readout preferences, including units, font, and the number of digits
- Connection settings, and the link to the adapter this profile last used
- Data output and live streaming settings
- Axis labels, and axis composition such as knee plus quill on a mill
- Workspaces, and the sub-datums saved in each one
- The tool library
- Probe profiles, managed through the "Probe Library"
- TouchDRO Plus activation, if the profile has been activated
The tool library is per profile by default. If you would rather keep one set of tools across every machine, switch on "Use Shared Tool Library" in the application settings, described there as allowing tools to be shared between multiple machine profiles.
Why Machine Profiles Are Useful
One Tablet, Several Machines
In most small shops only one machine runs at a time, and the tablet is not tethered to any of them. Give each machine its own profile, and moving the tablet from the mill to the lathe becomes a matter of switching profiles. Each machine keeps its own calibration on its own adapter, and each profile keeps its own workspaces and tools.
Combo Machines
On a combination machine the coordinate system itself changes with the mode. By convention the Z axis runs parallel to the spindle, so on a mill/lathe combo the longitudinal bed travel is Z in lathe mode and X in mill mode. The same is true of a vertical/horizontal mill, where the axis that reads Y in vertical mode becomes Z in horizontal.
A profile for each mode solves this, and nothing on the machine has to move. The scales stay where they are, still plugged into the same adapter inputs. Each axis has a "Prefix" setting that names the input stream it reads, so the knee scale can feed the Y readout in the vertical profile and the Z readout in the horizontal one. Switching profiles is the whole changeover.
Give each profile the machine type that matches its mode. The machine type sets which functions the application offers and how the readout screen is laid out, and it is chosen when the profile is created.
Both profiles can use the same adapter, so the scales are calibrated once and both modes read from that same calibration.
Several Operators, One Machine
Where more than one person uses a machine, a profile each lets everyone keep their own display preferences, units, and saved tools. More usefully, it lets them keep their own work in progress. One operator's part setup will not disturb another's.
A Job That Moves Between Machines
Roughing on one mill and finishing on another is common enough. Because each machine's profile holds its own workspace, you can move the part, connect to the second machine, re-indicate, and carry on. The first machine's setup is still there when the job comes back.
Switching Between Machine Profiles
The name of the current machine profile is shown at the top of the screen. Press it to open the "Machine Profiles" dialog, then press the profile you want. The same list can be opened from the application menu, under "Machine Profiles".
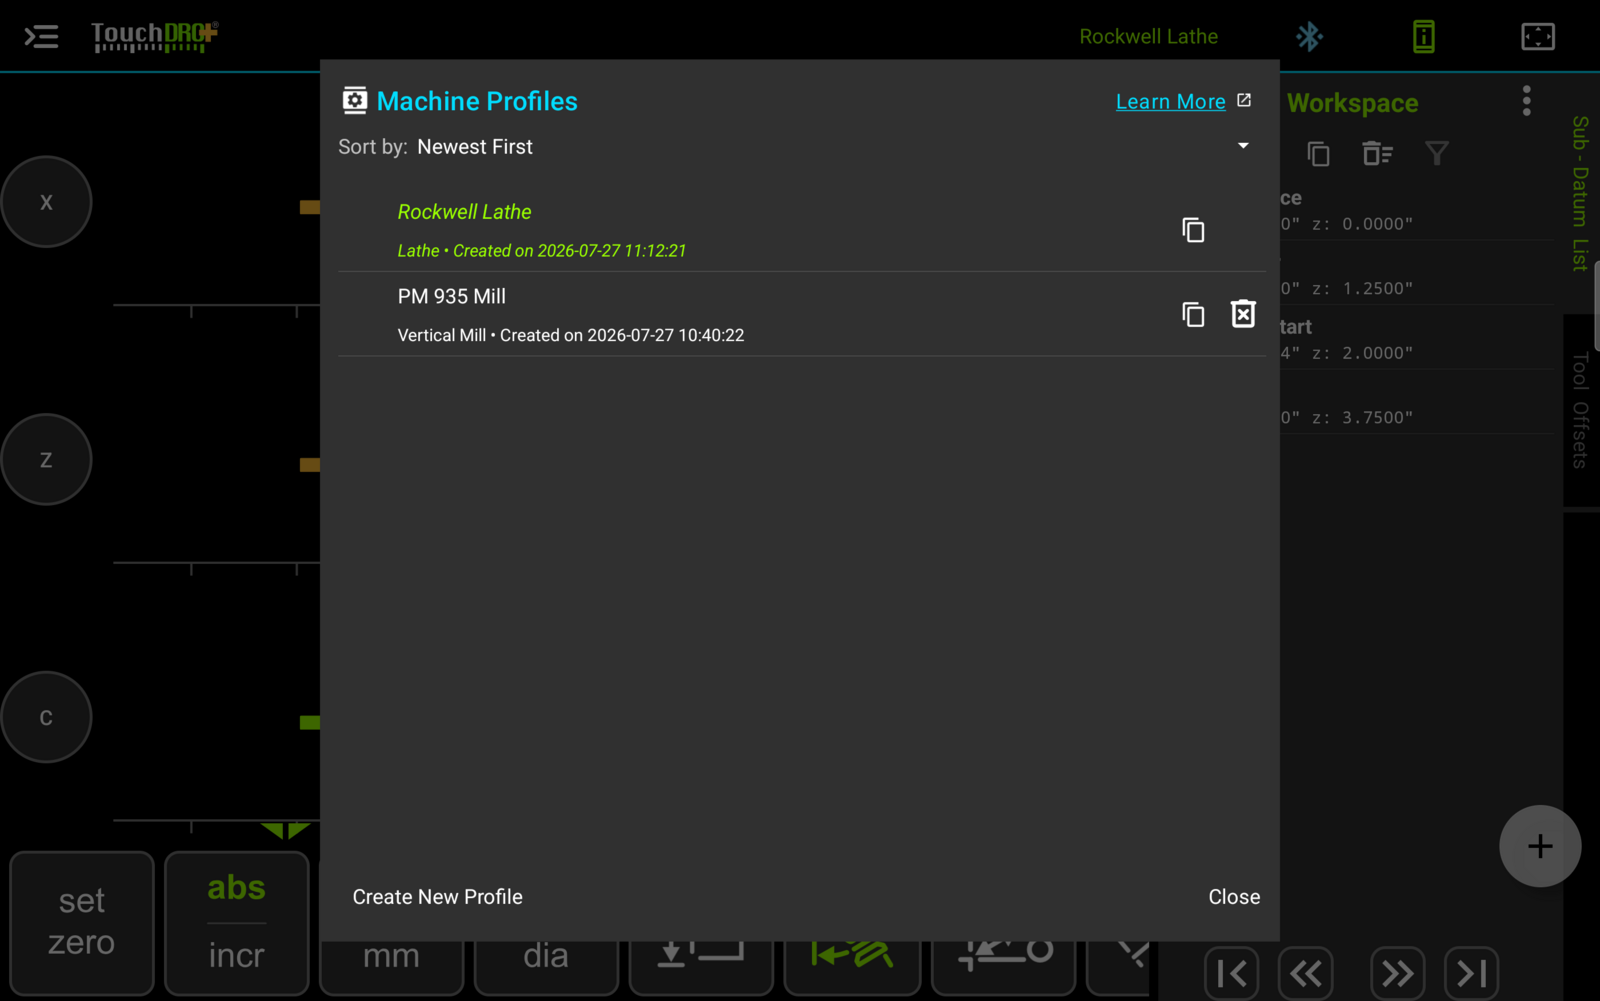
Each row gives the profile's name, its machine type, and the date it was created. The current profile is shown in green. The "Sort by" control at the top of the list changes the order the profiles are listed in.
Switching is safe in the middle of a job. TouchDRO stores where you were with the profile you are leaving and puts it back when you return. Your workspace, origins, selected tool, guides, and display settings will all be as you left them, and TouchDRO will reconnect to the adapter that profile was last using.
A profile that has never been used has nothing to restore. It will load with default settings and will need to be set up before the machine can be used.
Creating a Machine Profile
To create a machine profile, open the profile list by pressing the profile name at the top of the screen, then press "Create New Profile" at the bottom of the dialog. TouchDRO will open the "New Machine Profile" dialog, which collects what it needs to know about the machine before the profile can be used. The same dialog is the first thing TouchDRO shows after a clean install, so a new user's first profile is created the same way.
The dialog offers two paths. The profile can be set up from scratch by filling in the fields described below, or its settings can be taken from a backup file. Either way, TouchDRO will switch to the new profile once "Create" has been pressed.
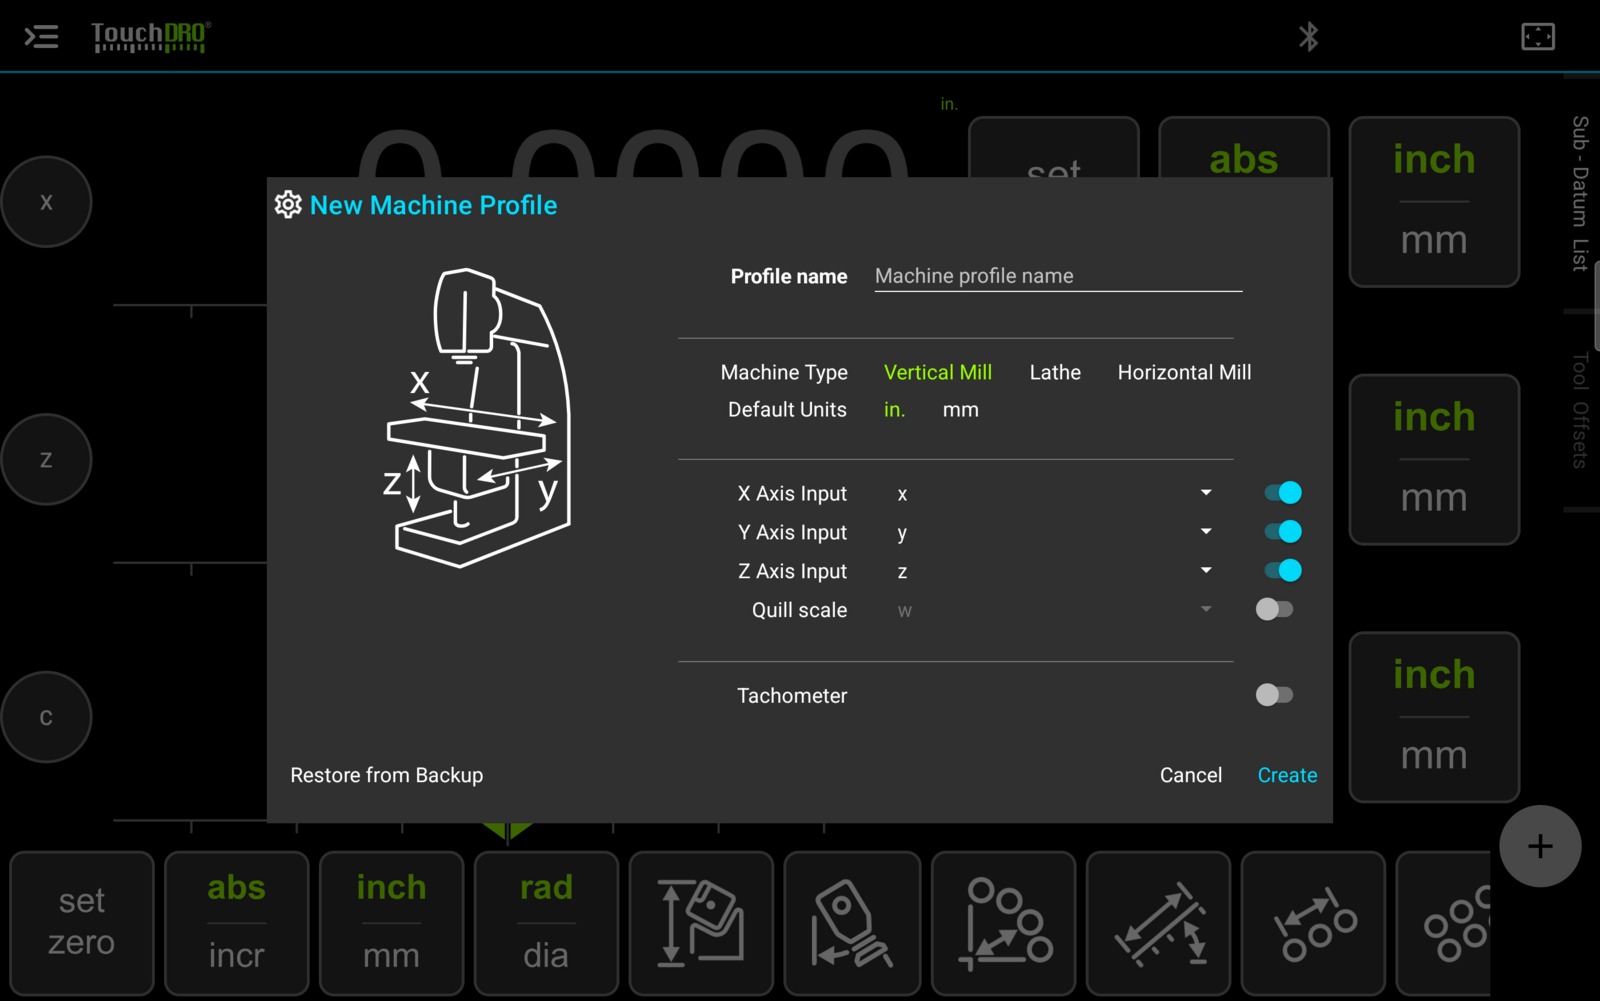
Profile Name
The name identifies the profile in the title bar and in the profile list, so it is worth naming the machine rather than the arrangement: "Bridgeport" reads better at a glance than "Mill 2". Each profile needs its own name, and TouchDRO will refuse a name that is already in use.
The name is permanent. There is no way to rename a profile afterward.
Machine Type
The machine type determines which functions TouchDRO offers and how the readout screen is laid out. A lathe profile gets the lathe functions, and a mill profile gets the milling ones. Like the name, the machine type can't be changed once the profile is created.
Once you select the machine type, the dialog will display a list of readouts that can be shown on the screen and the TouchDRO adapter inputs that will be mapped to them. In most cases you don't need to change the inputs.
Vertical Mill
Stand in front of the machine and face the spindle.
- X is the table moving left and right
- Y is the table moving toward you and away from you
- Z is vertical movement, parallel to the spindle. On a knee mill this is the knee, and a quill scale is added to the same readout as a second input
The dialog asks for these as "X Axis Input", "Y Axis Input", and "Z Axis Input", with a separate "Quill scale" row for the second Z input.
Lathe
Stand at the front of the lathe, facing the bed.
- X is the cross slide, carrying the tool toward and away from the workpiece centerline. This is the readout that can show diameter or radius
- Z is the carriage moving along the bed, parallel to the spindle
- Y has no meaning on a lathe. A third scale is set up as an additional readout rather than as Y
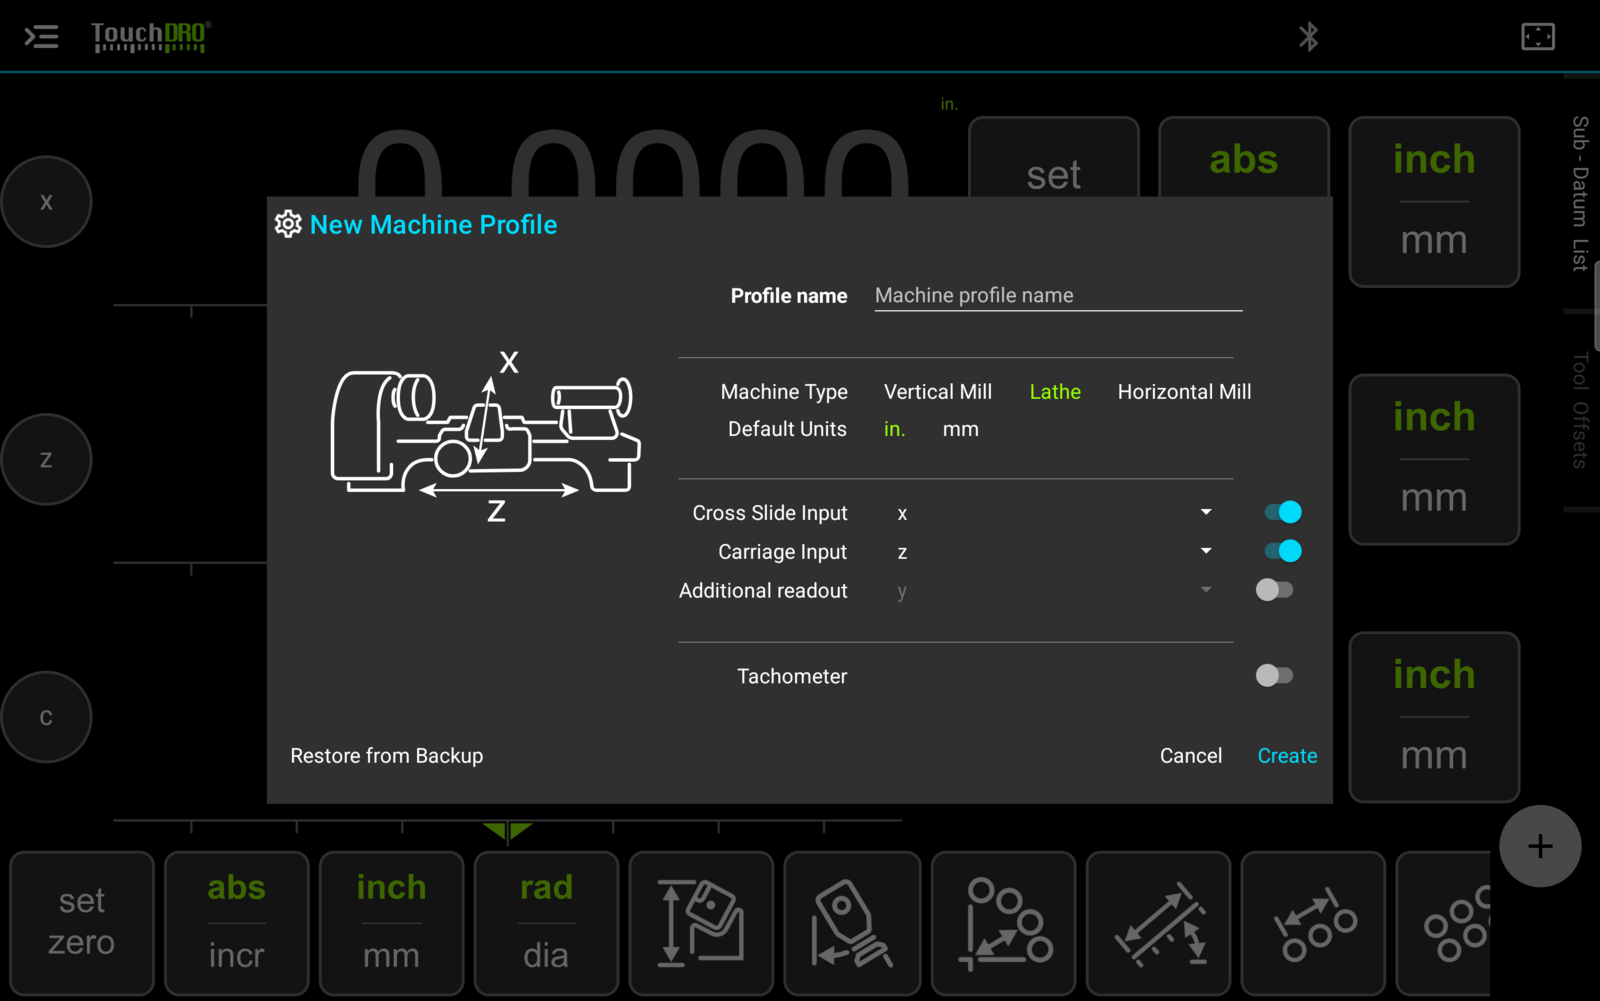
The dialog asks for these as "Cross Slide Input" and "Carriage Input". A third row, "Additional readout", covers a scale on something other than those two. When you switch it on, TouchDRO will show a "Measures" setting that says what that scale is on: "Tailstock", "Compound slide", or "Other". When "Compound slide" is selected, the dialog will also offer "Enable Vectoring", which is what the "Compound Slide Angle Compensation" function needs.
Horizontal Mill
The spindle points horizontally, out of the column and across the table.
- X is the table moving left and right, the same as on a vertical mill
- Y is the knee moving up and down
- Z is the saddle moving in and out, parallel to the spindle
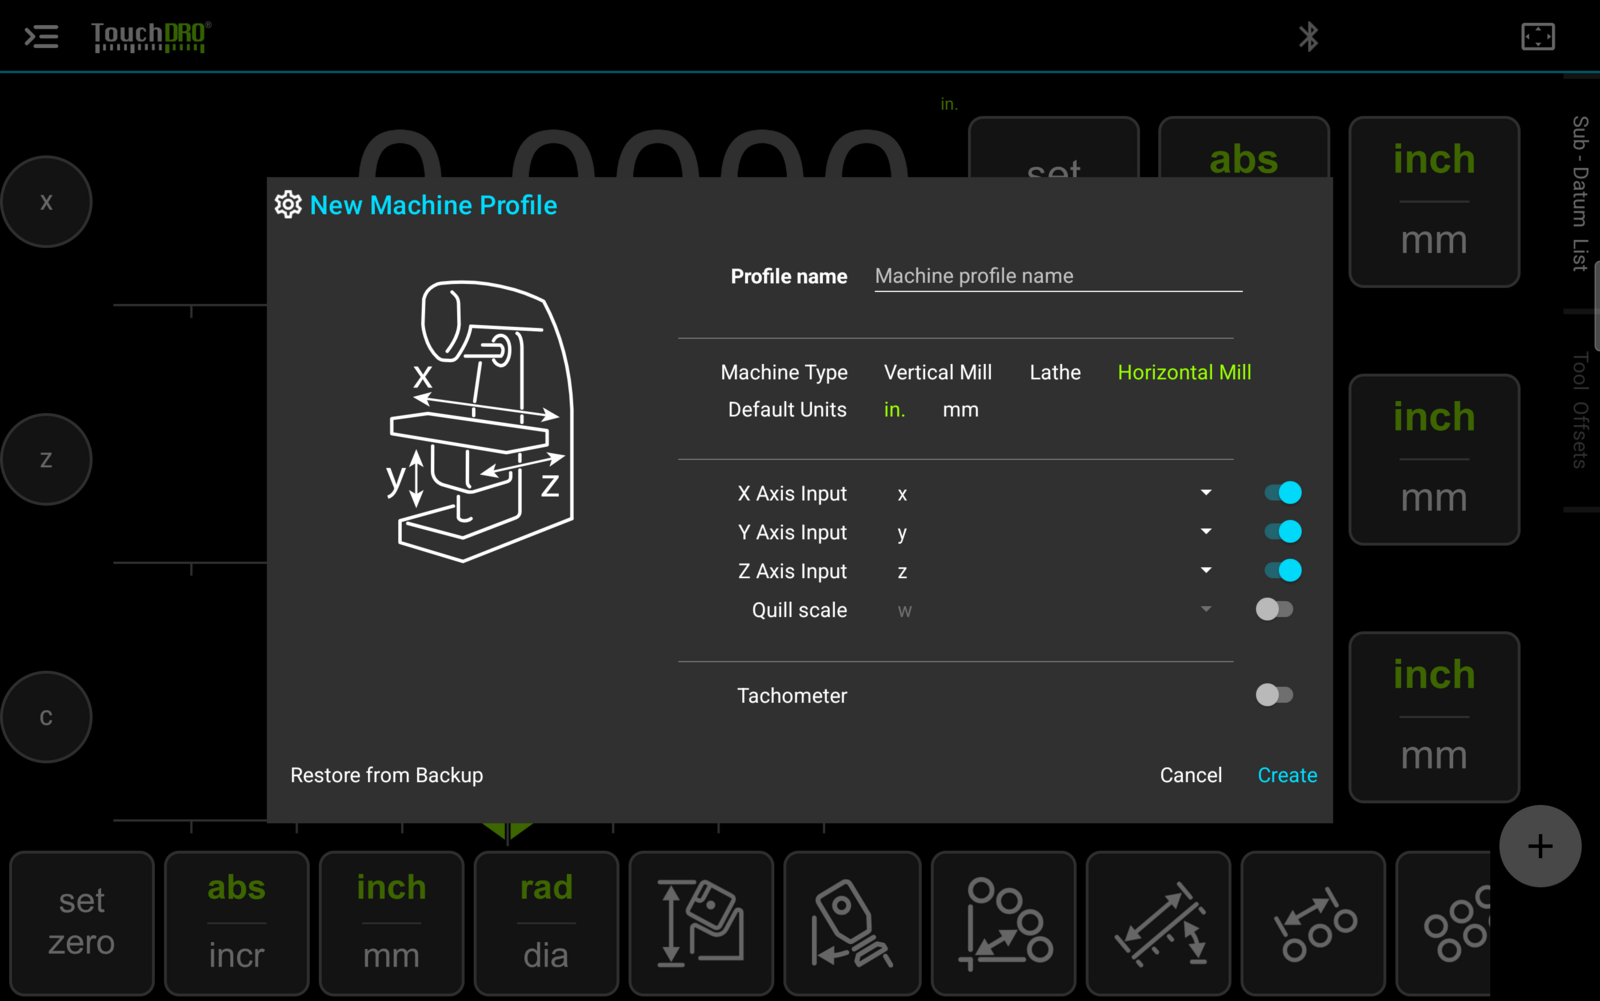
The input rows are the same as on a vertical mill: "X Axis Input", "Y Axis Input", "Z Axis Input", and "Quill scale". Only the drawing and the axis letters it carries change, which is the whole difference between the two mill profiles.
Default Units
Sets whether the profile starts in inches or millimeters. This is only the starting point, and the readouts can be switched between the two at any time from the main screen.
Axis Inputs
Each readout on the display needs to have at least one input mapped to it to receive position. The inputs are marked on your TouchDRO adapter as "x", "y", "z", and "w", but as mentioned earlier, they can be mapped to any readout. In most cases the default selection is fine.
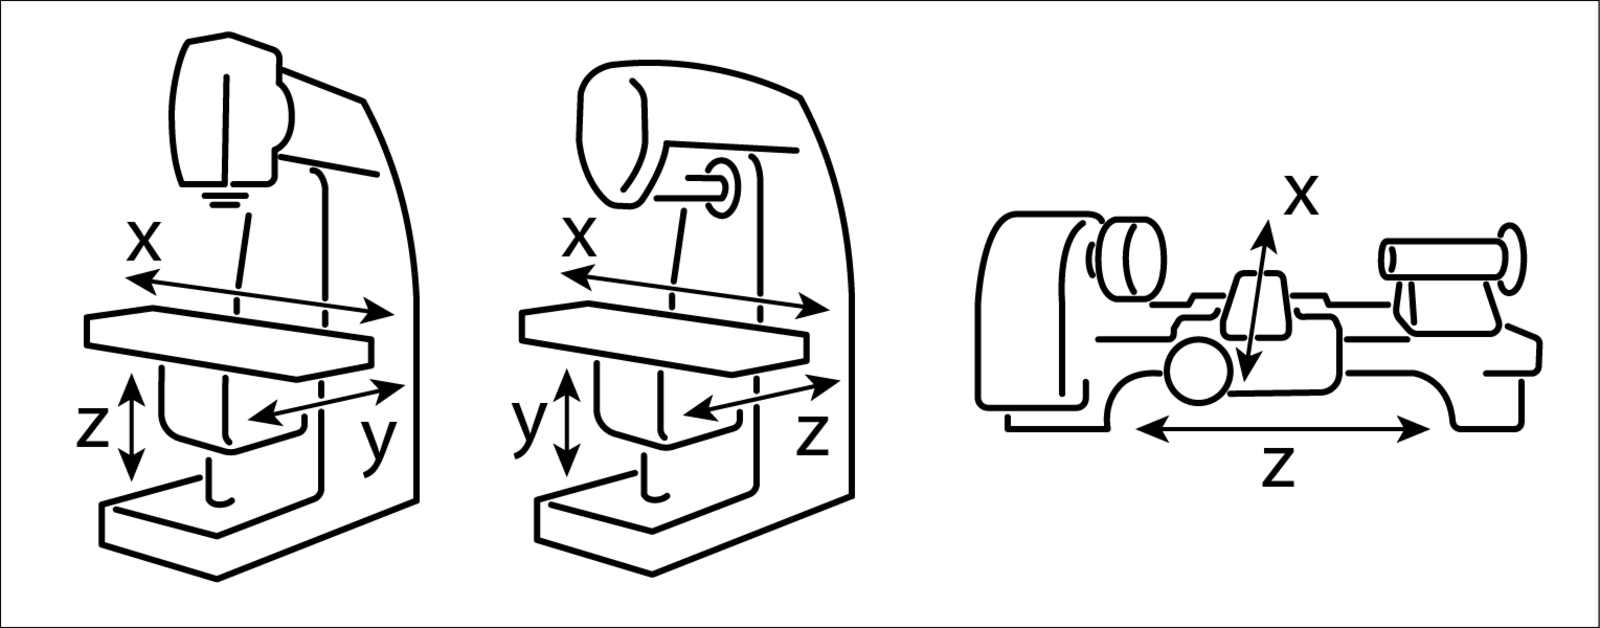
The mapping is configurable for combination machines, such as mill/lathe combos or universal mills with a horizontal and a vertical spindle. On such a machine, you will likely want to set up two separate profiles, one for each spindle, and remap the inputs to match the conventional coordinate system. For more information, see the "How to Use TouchDRO on a Combination Machine" guide.
Restore from Backup
The dialog's other path is "Restore from Backup", at the bottom left. It takes the new profile's settings from a file exported earlier, as described in the "Backing Up and Restoring Settings" section below. This is the shorter route when a profile is being rebuilt after a reinstall, carried to a second tablet, or used as the starting point for a similar machine.
Note that if you are importing a profile, the settings on this dialog will be ignored. The import will select the machine type that matches the backup, and take the profile name, the input mapping, and the rest of the settings from the file as well.
TouchDRO will import the settings and switch to the new profile. The screen might flicker as one profile is unloaded and the other is loaded.
Deleting a Machine Profile
Press the delete icon on the profile's row in the "Machine Profiles" dialog. TouchDRO will ask for confirmation first, and the confirmation names what goes with it: all workspaces, sub-datum coordinates, tools, and probe profiles belonging to that profile. This can't be undone.
Activating TouchDRO Plus
TouchDRO Plus is activated on a machine profile. The adapter establishes whether Plus is available, and the activation lands on the profile that was connected at the time.
The first time a profile connects to an adapter eligible for Plus, TouchDRO will ask whether to activate it, naming the adapter model in the prompt. Answering "No" leaves the profile as it is, and you will be asked again on a later connection.
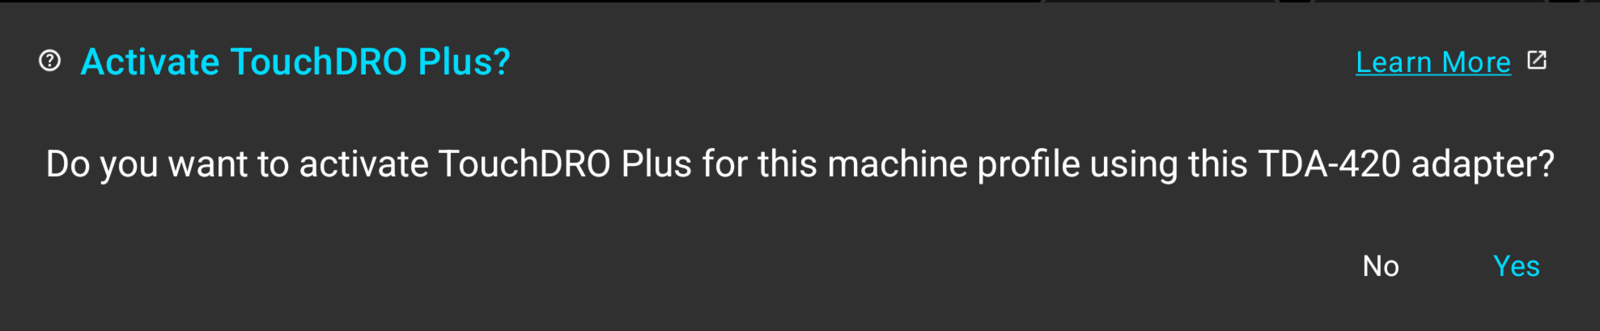
Connecting a Plus profile to an adapter that can't be verified as a Plus adapter will bring up a notice explaining that the two can't be used together. It offers two ways forward, and which one you want depends on why the verification failed.
- If this is the branded adapter you normally use, verification has probably failed in passing. Dismiss the notice, wait about half a minute, and connect again.
- If you have just connected a legacy, home-built, or third-party adapter, verification will not start working. Use the duplicate option instead, which makes a copy of the profile without Plus.
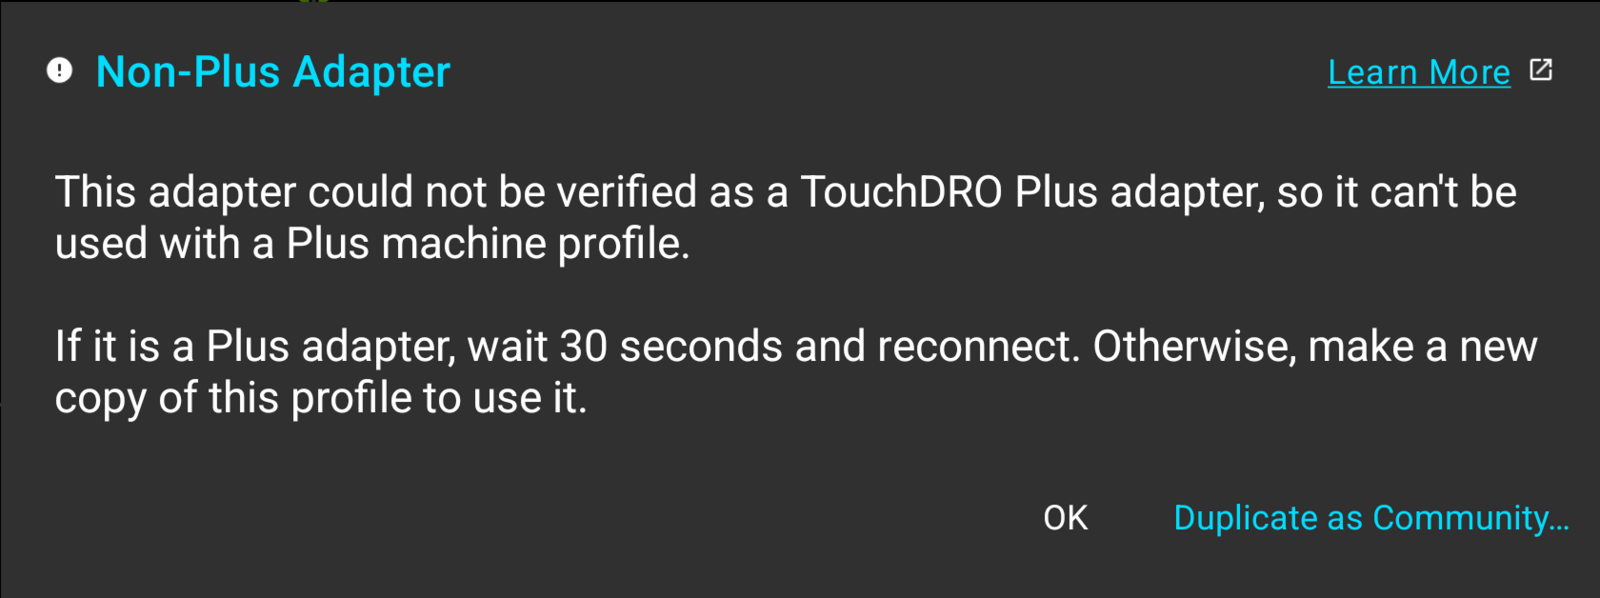
This will create a full copy: your workspaces, sub-datums, tools, and probe profiles are all duplicated into it. Nothing is lost by taking this route; the copy simply lacks the Plus features.
Backing Up and Restoring Settings
Setting up a machine profile takes a while. Axis labels, input assignments, display preferences, and connection settings all have to be entered, and none of that is work worth doing twice. TouchDRO can write a profile's settings out to a file and read them back later.
A saved file will put a profile back after a tablet is replaced or the application is reinstalled. It will also carry a working setup across to a second tablet, or give a similar machine a head start.
"Export settings" writes the file. It sits under "Backup" at the bottom of the "Application Settings" screen, described there as saving this machine profile's settings to a file. Exporting doesn't depend on the profile having Plus.
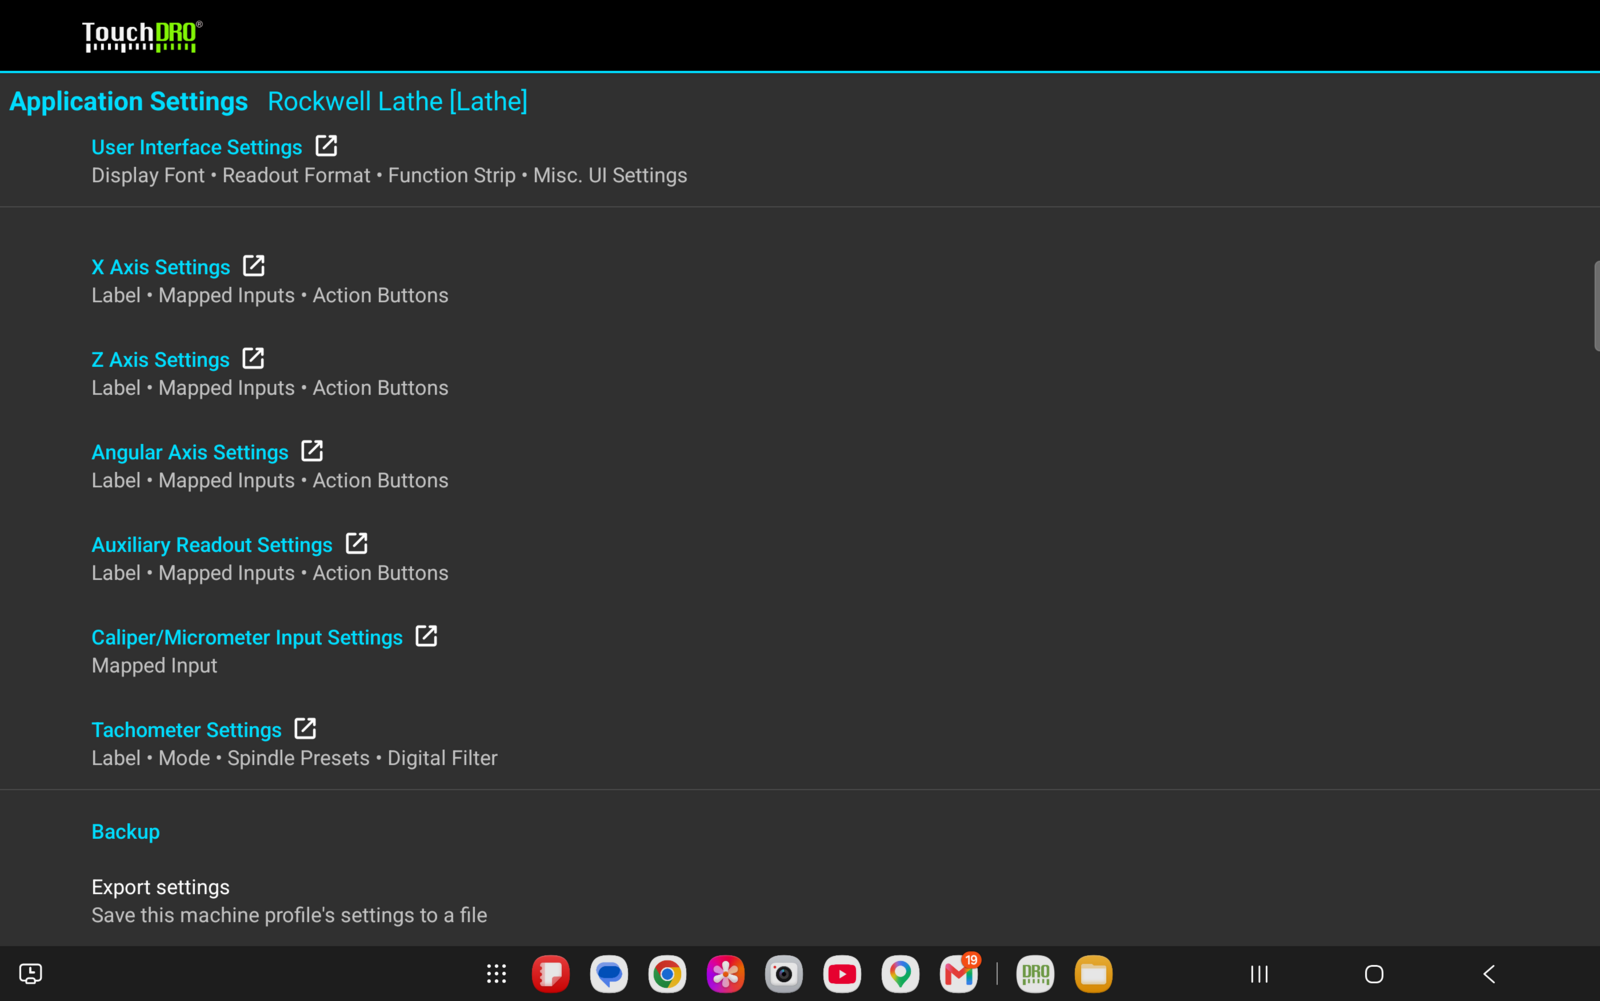
A saved file is read back when you create a profile, through the "Restore from Backup" option described in the "Creating a Machine Profile" section above. TouchDRO will show what the file holds before any of it is applied.
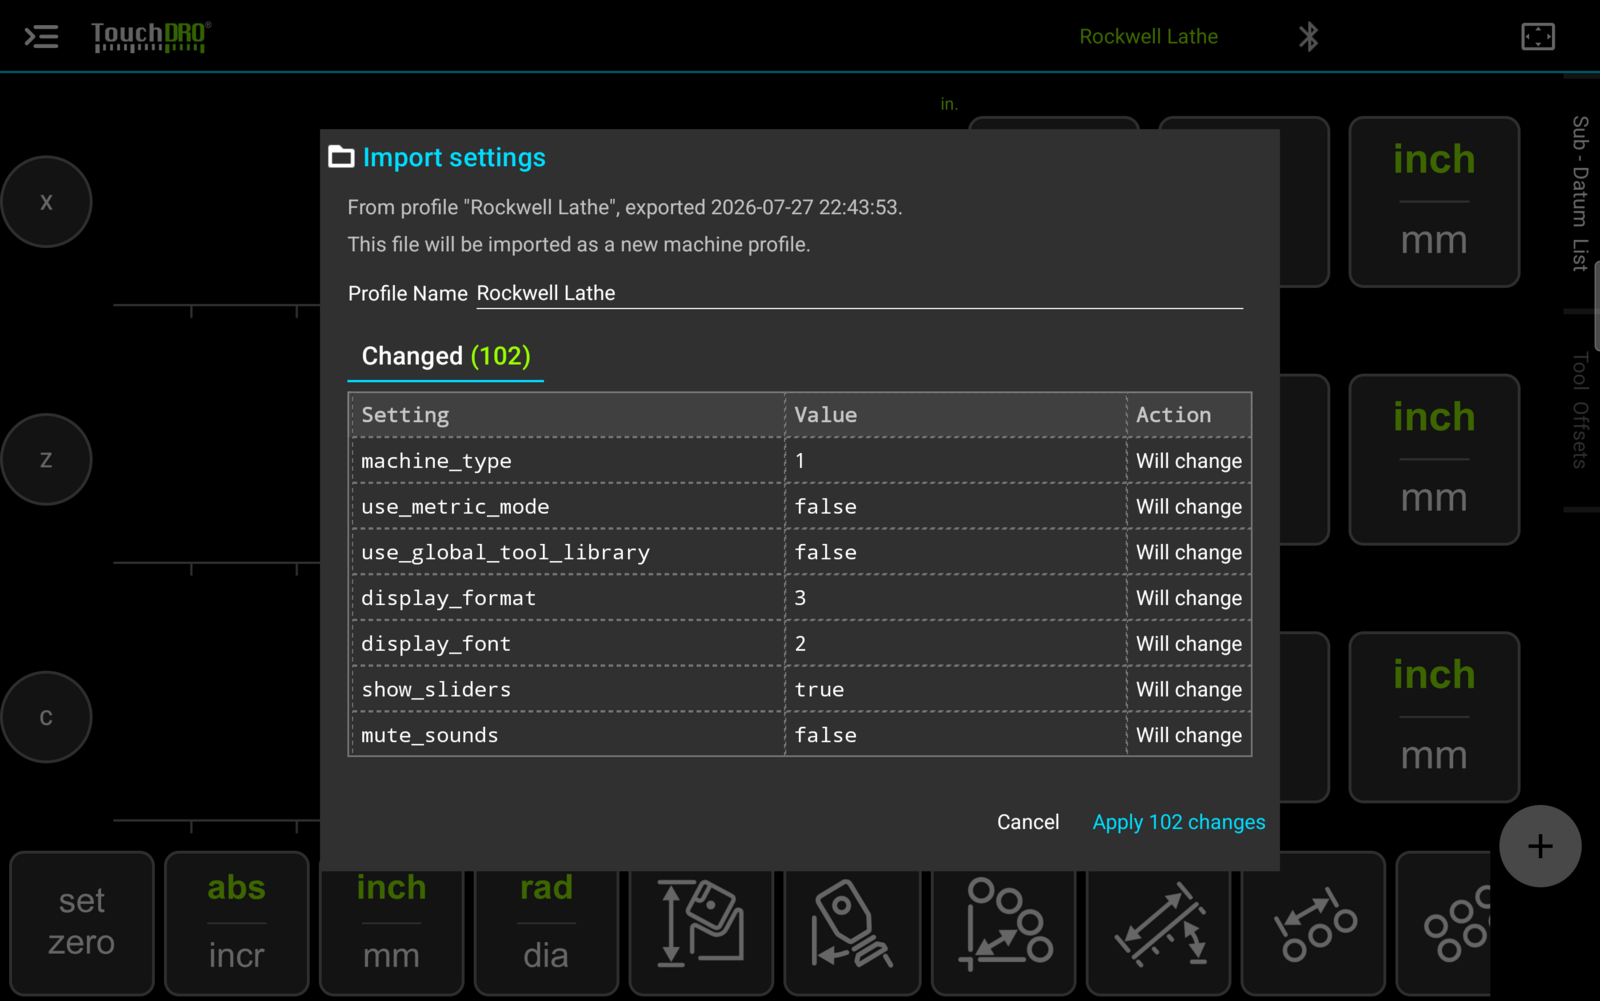
The preview names the profile the file came from and the date it was exported, and lists the settings it will change under a "Changed" tab that carries the count. The profile name is filled in from the file and can be edited before the import is applied. Nothing is written until the "Apply" button is pressed, and that button repeats the number of changes it is about to make.