
Adapter Details Dialog
The Adapter Details dialog shows information about the connected TouchDRO adapter and gives you access to the per-input settings that are not part of day-to-day machining. From here you set the scale protocol for each input, reset an input counter, run the reference-mark routine, and choose what each auxiliary input does. Most of these are wiring-time decisions: you set them once when you connect a machine and rarely touch them again.
Opening the Dialog
The dialog is only available while the application is connected to an adapter. When you connect, the adapter and the application exchange a short handshake and the adapter authenticates itself. This usually takes 10 to 30 seconds.
While the handshake runs, a device-status button appears next to the Bluetooth icon at the top of the screen. The button is there whenever an adapter is connected, and it is what opens this dialog.
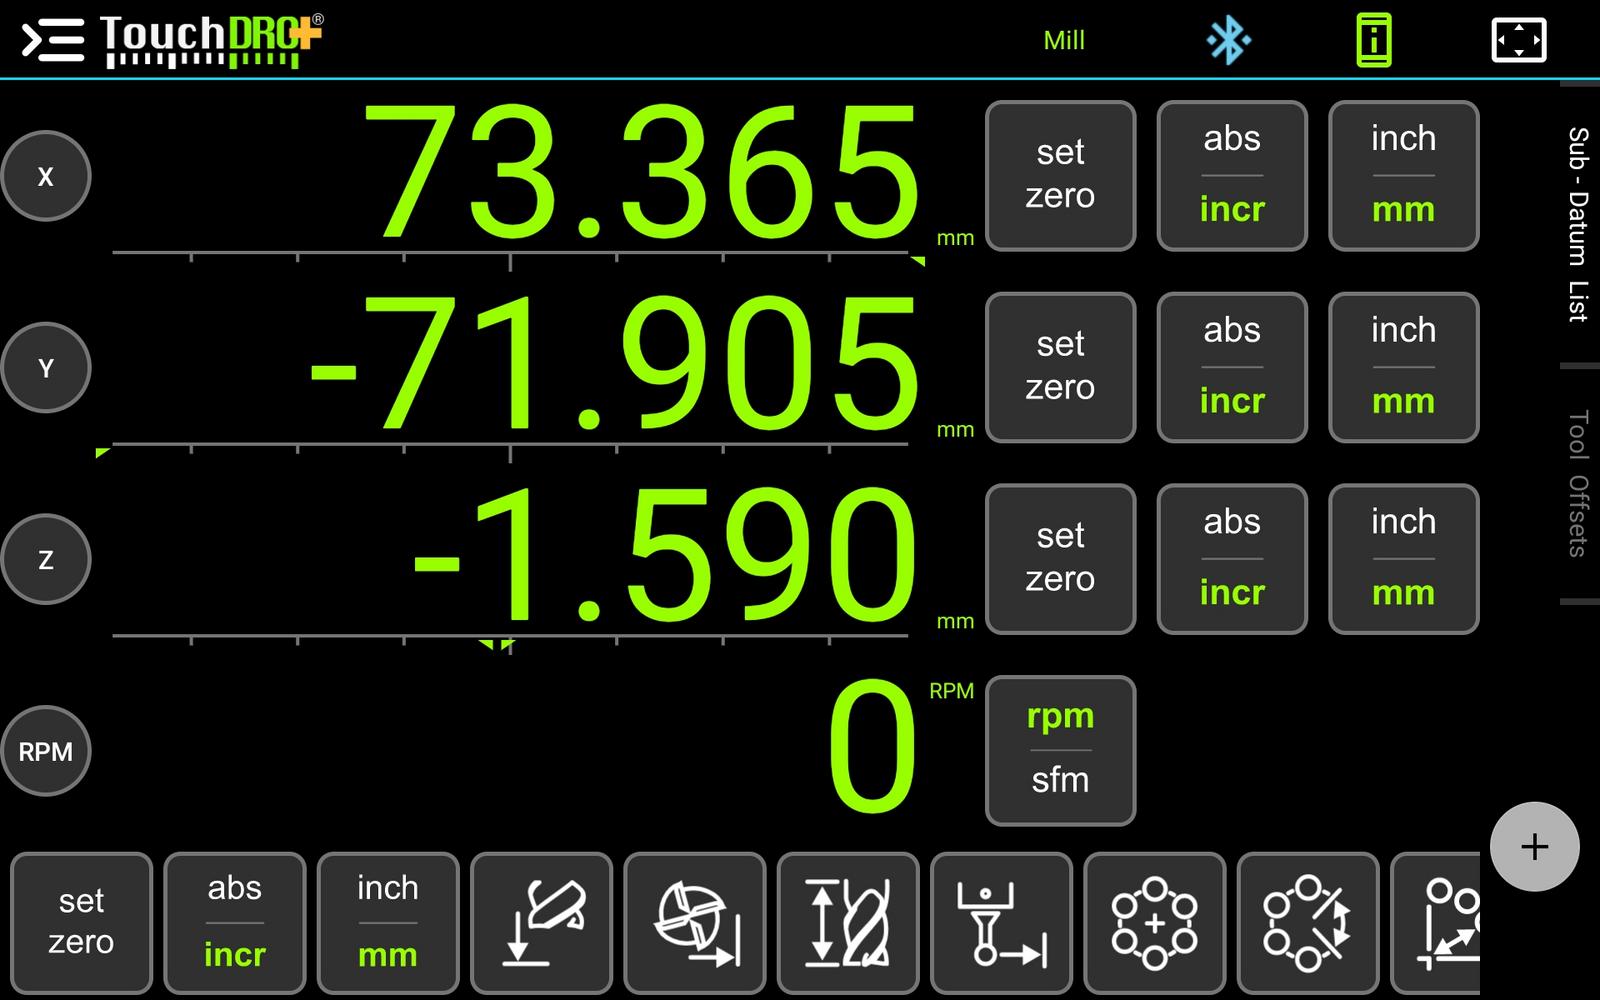
The Adapter Button on TouchDRO 3.30.00 and Later
What the button shows depends on what TouchDRO has been able to work out about the adapter. While the handshake is still running the button pulses gently and can't be pressed, because the answer isn't settled yet. Once it settles, the icon reports one of three things.
| Button | What it means | Press | Press and hold |
|---|---|---|---|
| No button | No adapter is connected | Not applicable | Not applicable |
| Amber question mark, pulsing | The handshake is still running. This normally takes 10 to 30 seconds | Nothing until the handshake settles | Nothing until the handshake settles |
| Green "i" | A TouchDRO adapter whose signature has been verified | Opens this dialog | Nothing |
| Green question mark | TouchDRO knows which adapter this is but could not verify it as a branded one. Usual for legacy, home-built, and third-party adapters, and for any adapter connected over Bluetooth that isn't verified | Opens this dialog | Opens the adapter picker, on USB and Wi-Fi |
| Amber question mark, steady | A USB or Wi-Fi adapter that TouchDRO can't identify on its own, so it needs to be picked by hand | Opens the adapter picker | Opens the adapter picker |
The Adapter Button on TouchDRO 3.26.06 and Earlier
On these builds the button turns green once the handshake finishes. Press it to open the Adapter Details dialog.
Adapter Information
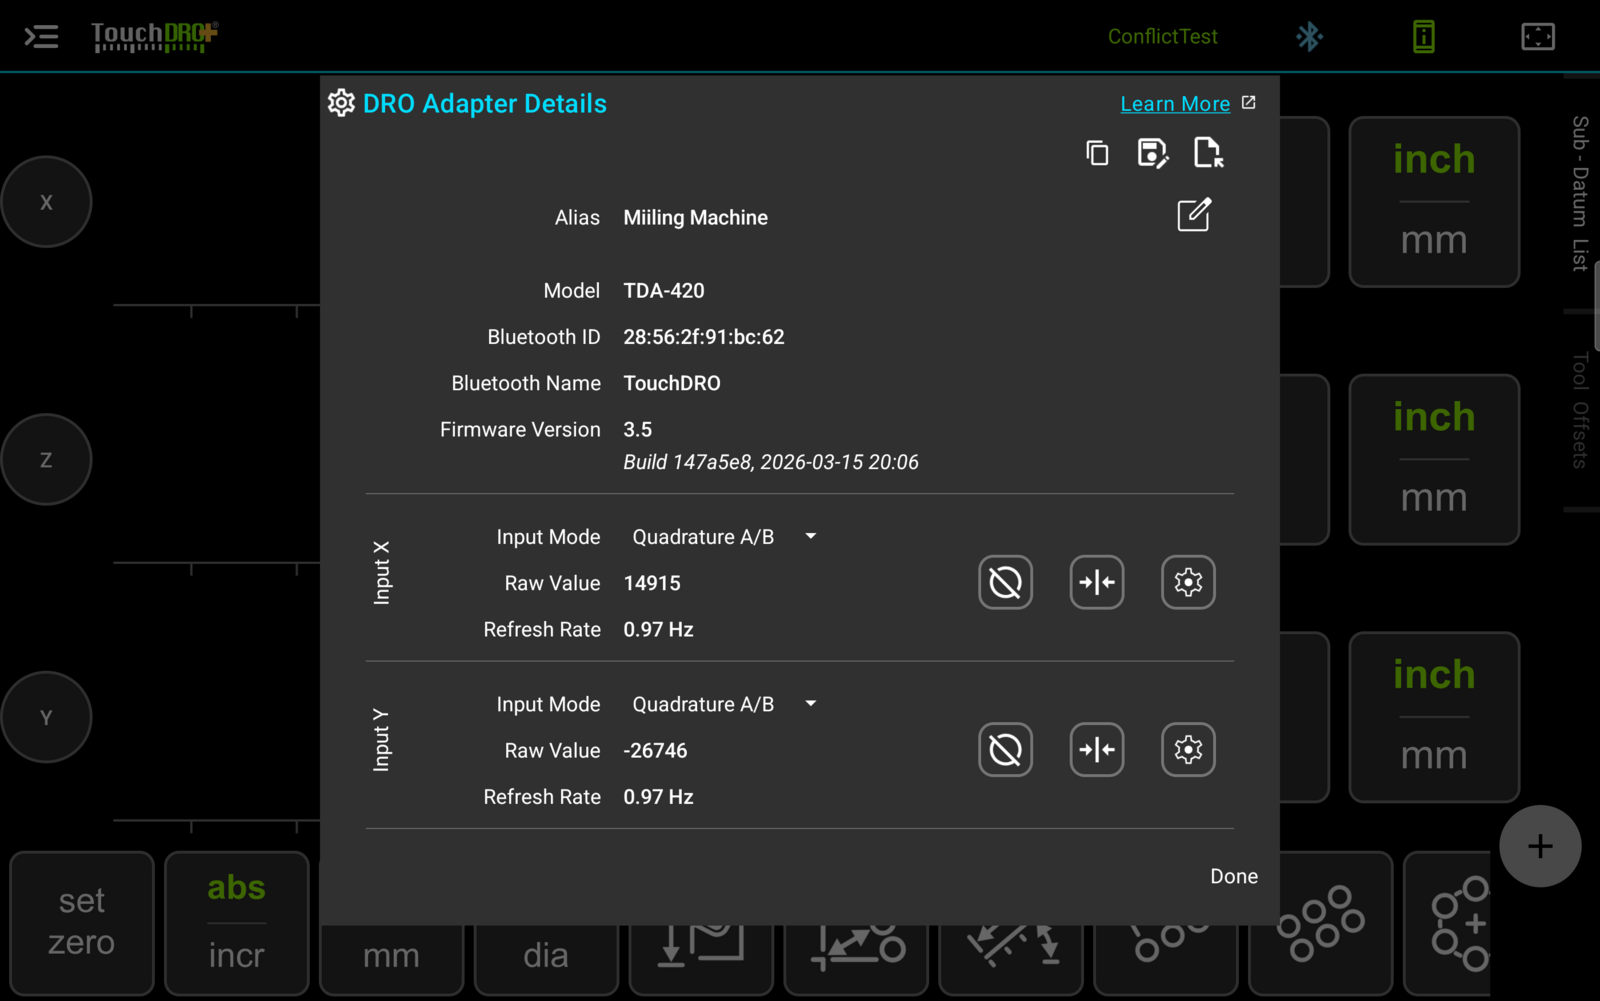
The top of the dialog lists the adapter's identity and firmware. All of it is read-only.
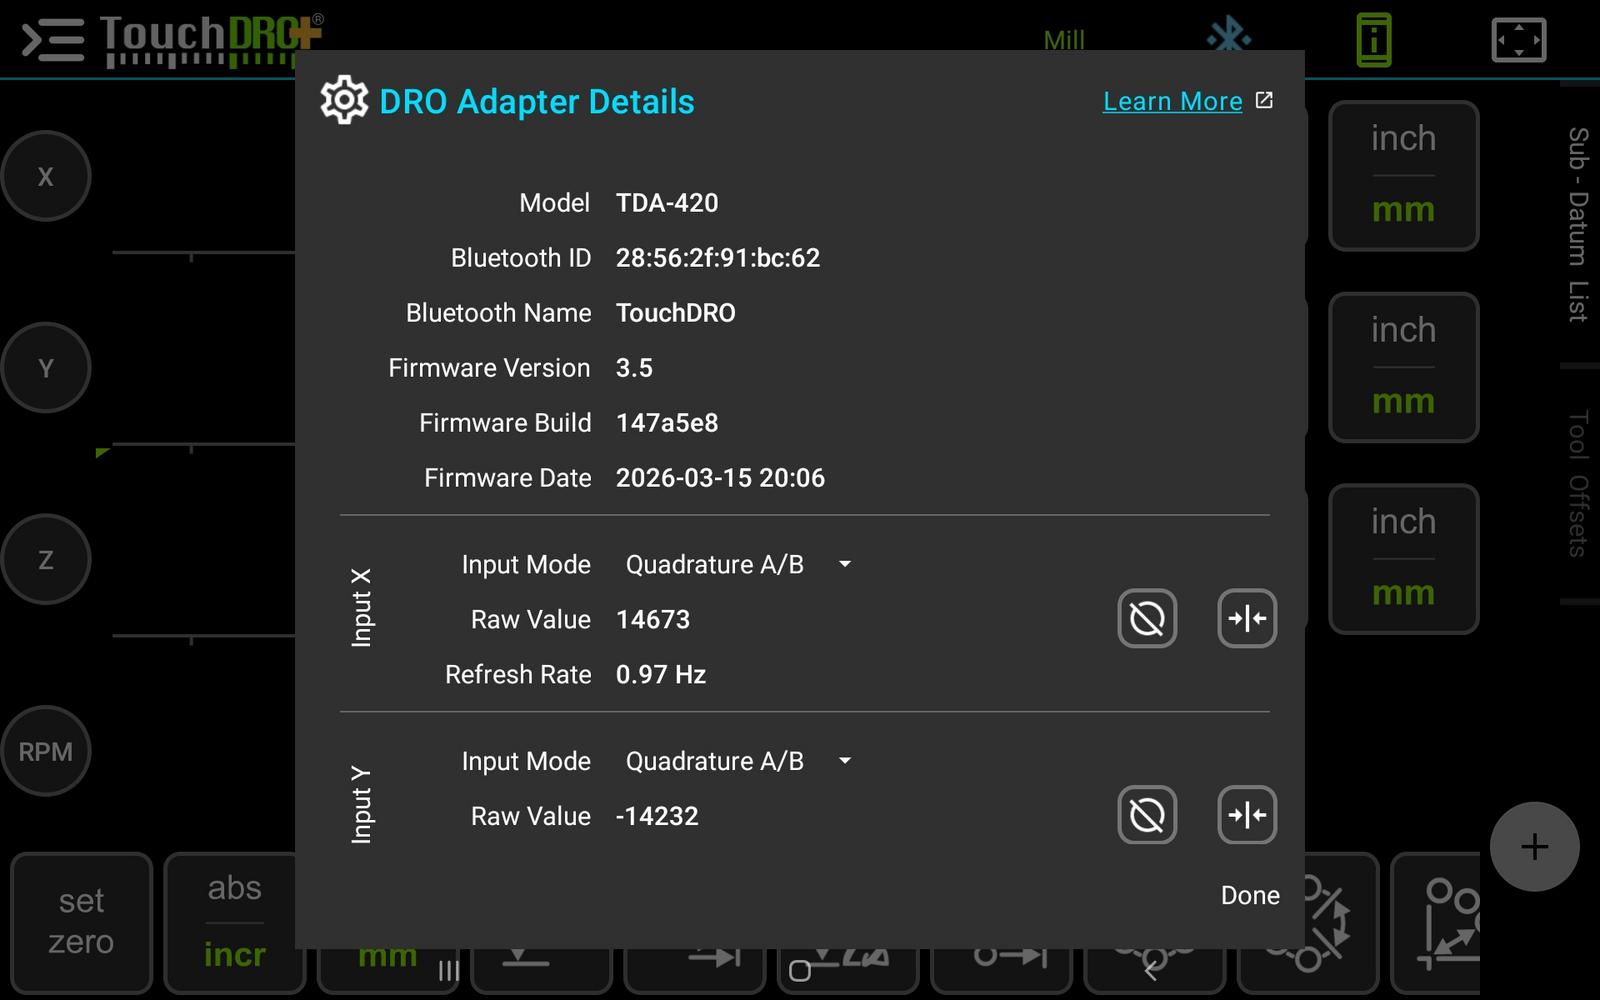
- Model: the adapter model, for example TDA-420.
- Bluetooth ID: the adapter's Bluetooth MAC address. Along with the name, this is how the adapter appears in your tablet's Bluetooth device list.
- Bluetooth Name: the name the adapter broadcasts. Current-generation adapters use "TouchDRO". If you have paired more than one adapter, the ID is what tells them apart in the Bluetooth list.
- Firmware Version: the version of the firmware running on the adapter.
- Firmware Build: a short build identifier. If you contact us about a problem, this lets us pin down the exact code your adapter is running.
- Firmware Date: when the firmware was flashed and tested, before the adapter shipped.
Scale Inputs
Below the adapter information, each scale input has its own block. Depending on the adapter, that is typically inputs X, Y, Z, and W. Each block shows the input mode, the raw value, the refresh rate, and a row of action buttons.
Raw Value is the unscaled count coming from the scale, and Refresh Rate is how often that input reports. Both are useful for confirming that a newly wired scale is alive and counting before you calibrate it: move the axis by hand and watch the raw value change.
Which buttons an input carries depends on its mode. An input reading quadrature has all three. One set to a serial protocol, or an aux input, carries only the gear, since resetting the counter and hunting a reference mark are things only a quadrature scale does.
Input Mode
The Input Mode dropdown sets the protocol the adapter uses to read that input's scale. TouchDRO supports several protocols, including Quadrature A/B, BIN6, iGaging 21-bit, and Mitutoyo SPC. The mode you pick has to match the scale wired to that input. Setting an input to Disabled stops the adapter from polling it.
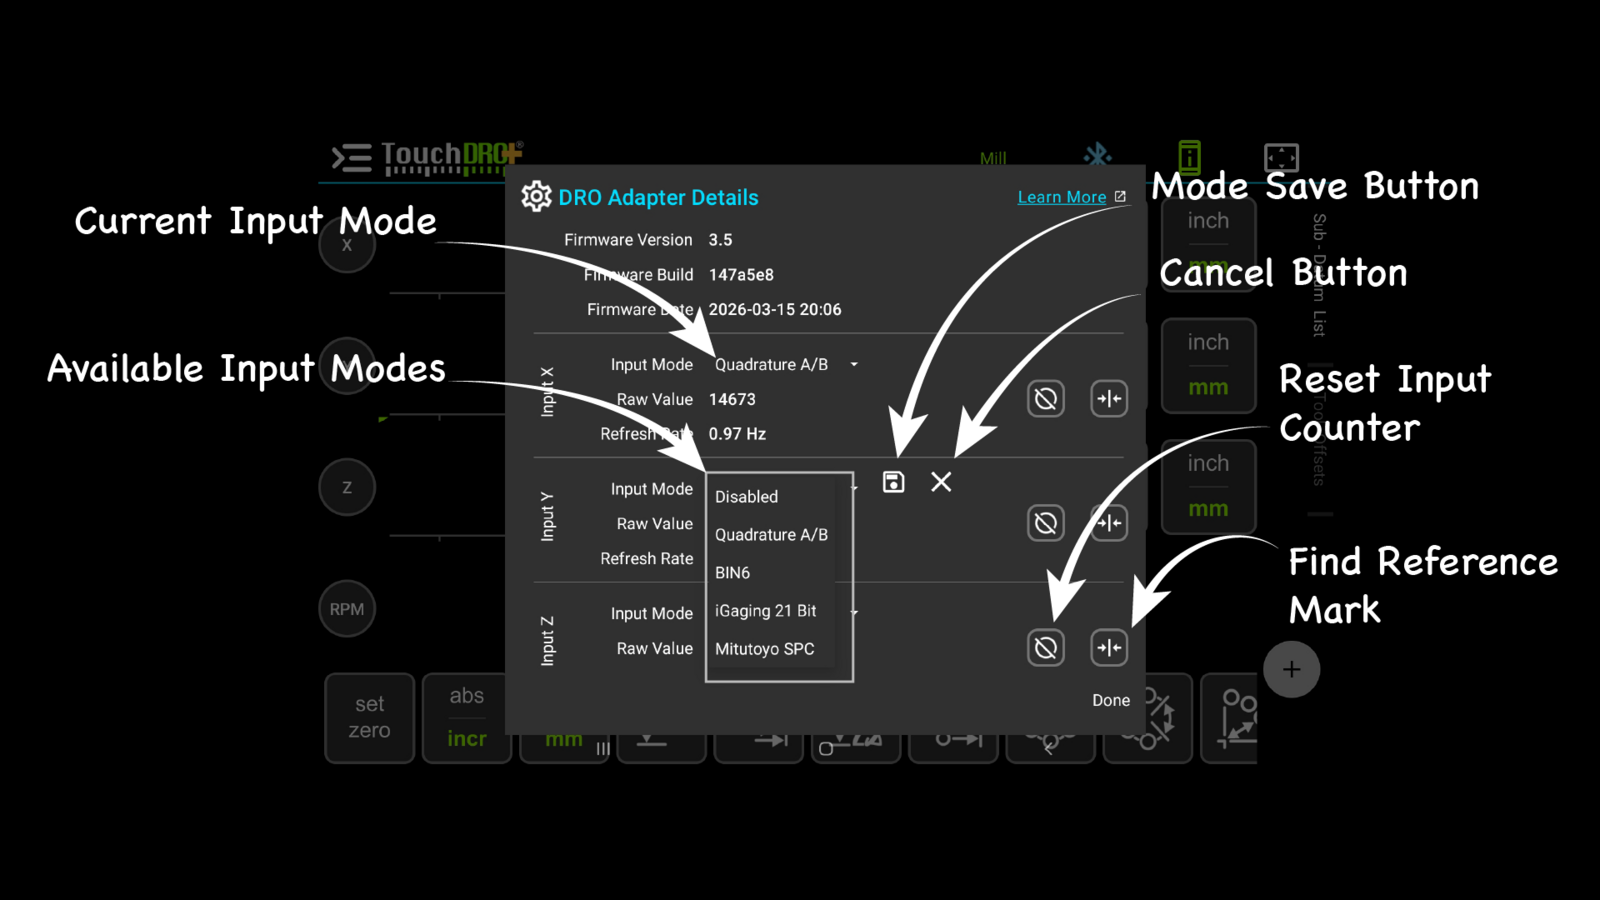
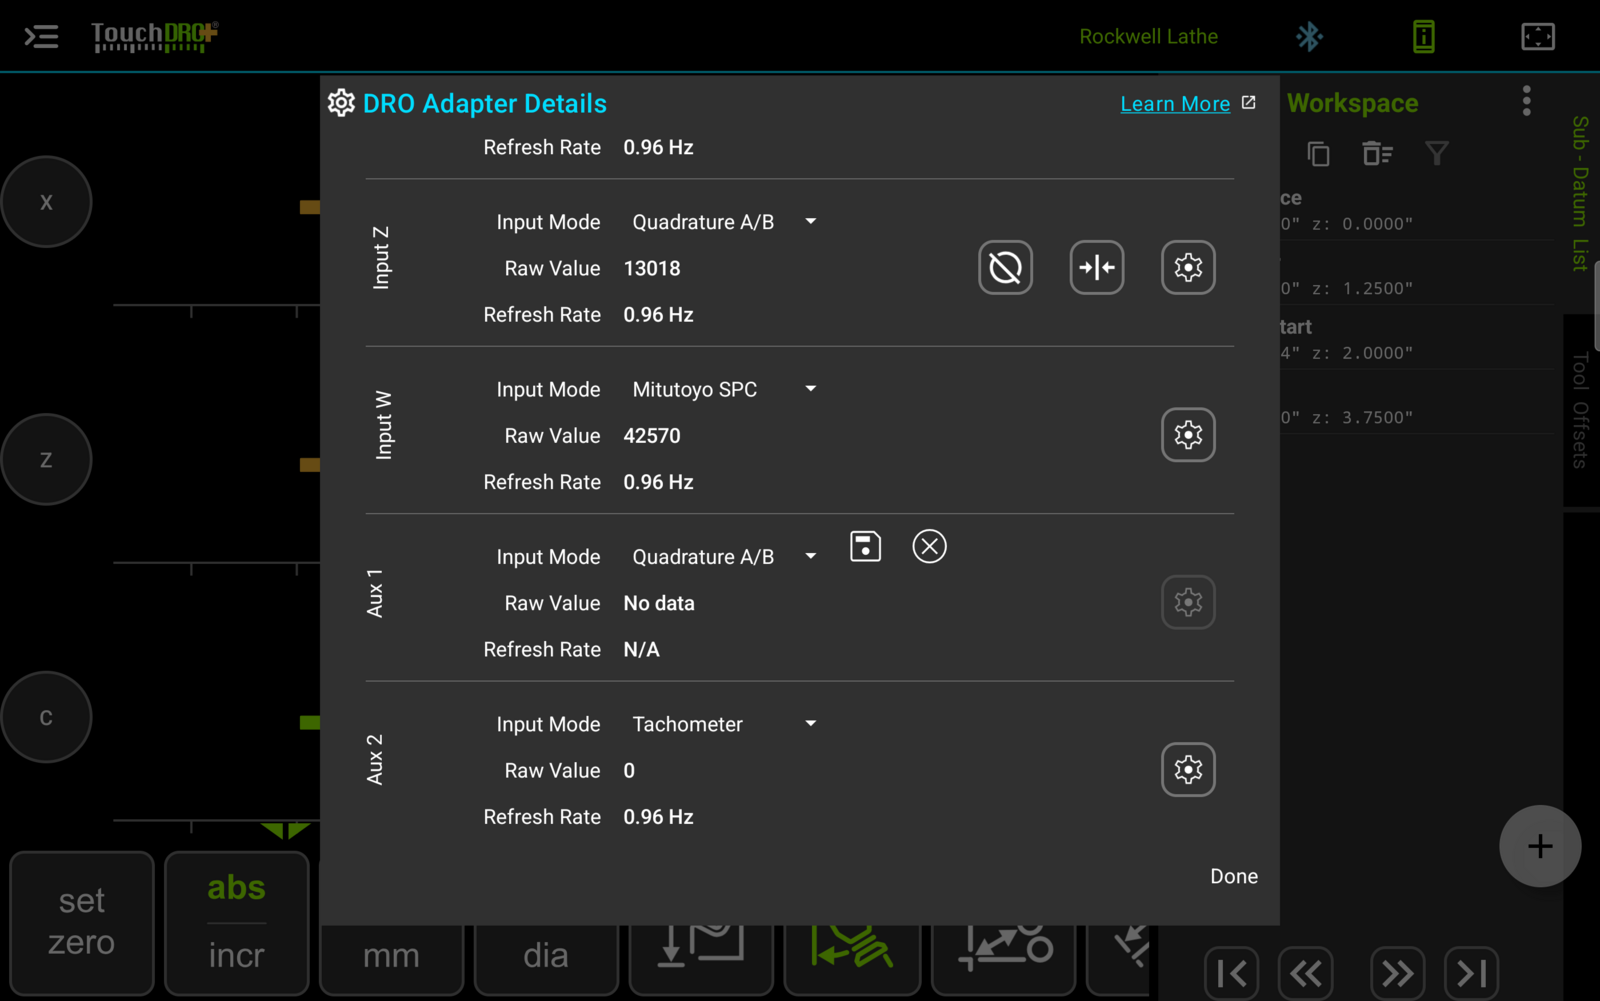
Changing the dropdown does not take effect right away. As soon as you pick a different mode, a Save button and a Cancel button appear beside it, and that input's gear button is disabled until you settle the change. Save records the new mode; Cancel discards it and leaves the input as it was. A saved mode change still needs an adapter restart before it is active, covered in Applying Changes below.
Resetting the Input Counter
The reset button, marked with a circle and a line through it, sets the input's raw counter to zero. This works at the adapter level rather than the display level, so it clears the raw value shown in this dialog. It is mainly useful when you are setting up or troubleshooting a scale and want a known starting count.
On scales without reference marks, the reset button can also re-establish machine zero after a power loss: move the machine to a repeatable home position, such as a hard stop or an indicated block, and reset the counters there. The result is only as repeatable as the physical stop, but it is what makes features that rely on a durable machine zero, such as "Machine Datums", usable without reference-mark scales.
Encoder Settings
The gear button opens that input's "Encoder Settings (Input X)" dialog, which holds the encoder type, the resolution, the counting direction, and the backlash and error correction settings for the scale on that input.
Reference-Mark Routine
The reference-mark button starts the reference routine for scales that have one or more reference marks. A reference mark gives the scale a repeatable absolute position, so the adapter can re-establish the same zero after a power cycle.
To run the routine:
- Move the scale to a position between two reference marks.
- Tap the reference-mark button. The button shows a spinner while the adapter waits for a mark.
- While the spinner is active, move the scale toward a reference mark.
- When the adapter detects the mark, it sets the counter to zero and the DRO emits a beep.
If the routine does not find a mark before it times out, the application plays an "Err" tone. Move the scale closer to a mark and run the routine again.
Auxiliary Inputs
Below the scale inputs, the adapter's auxiliary inputs have their own Input Mode dropdown. The aux inputs are general-purpose: the mode you choose decides what each one does. Changing an aux mode uses the same Save and Cancel buttons as the scale inputs, so the change takes effect when you Save it.
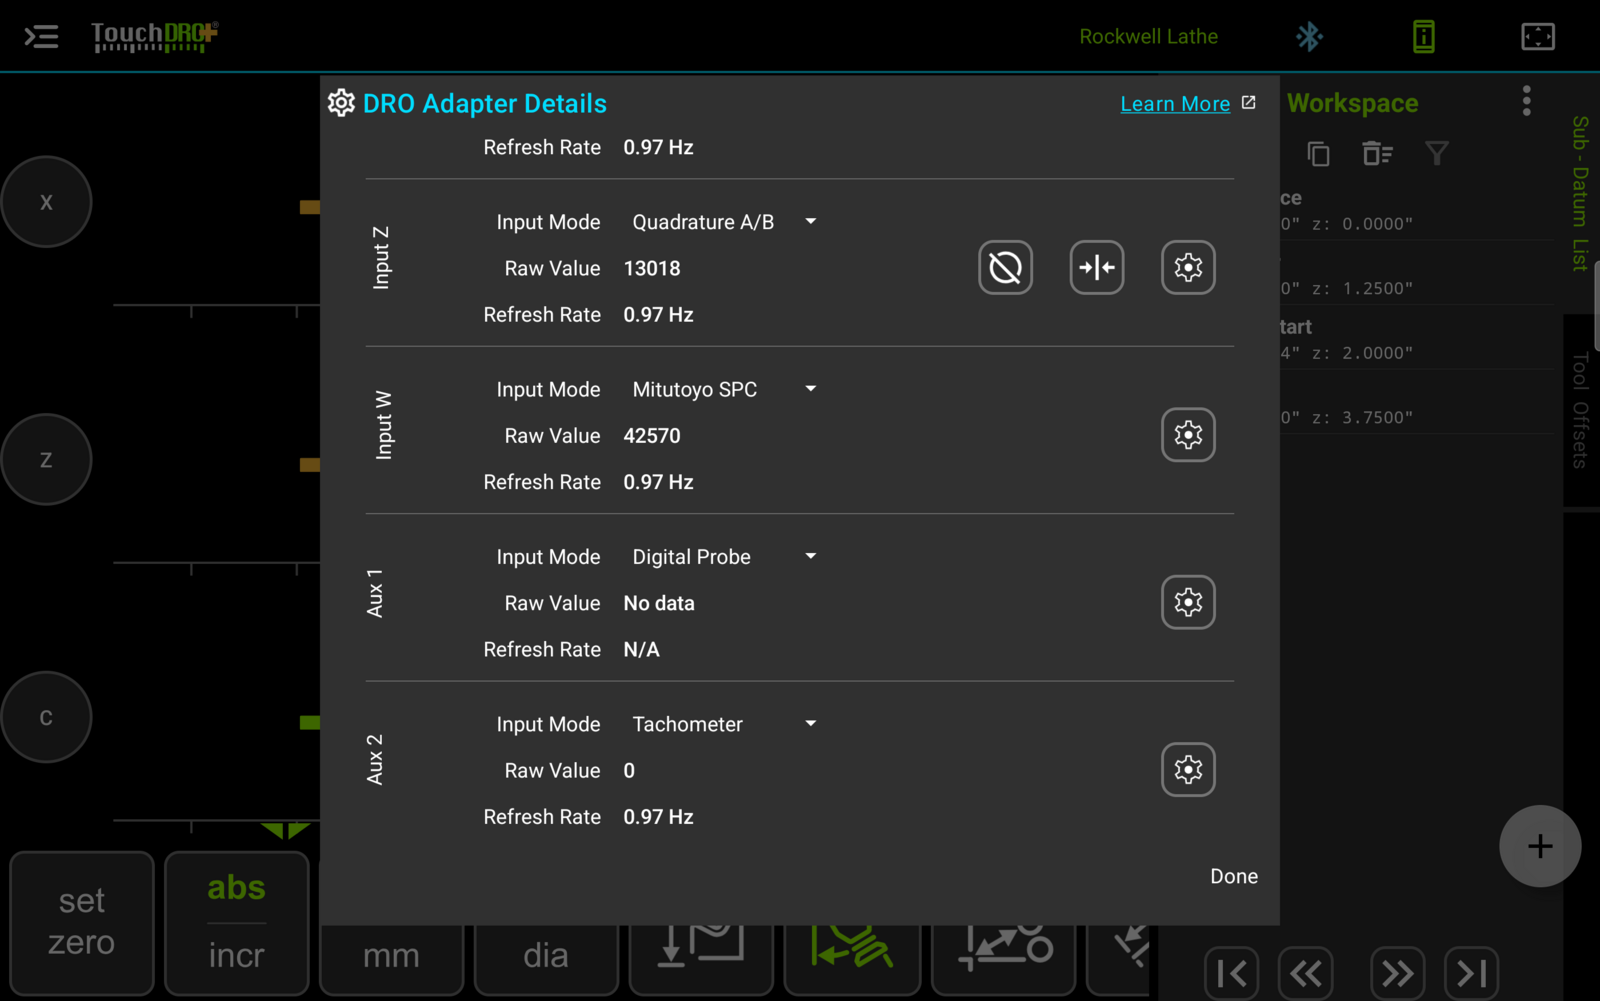
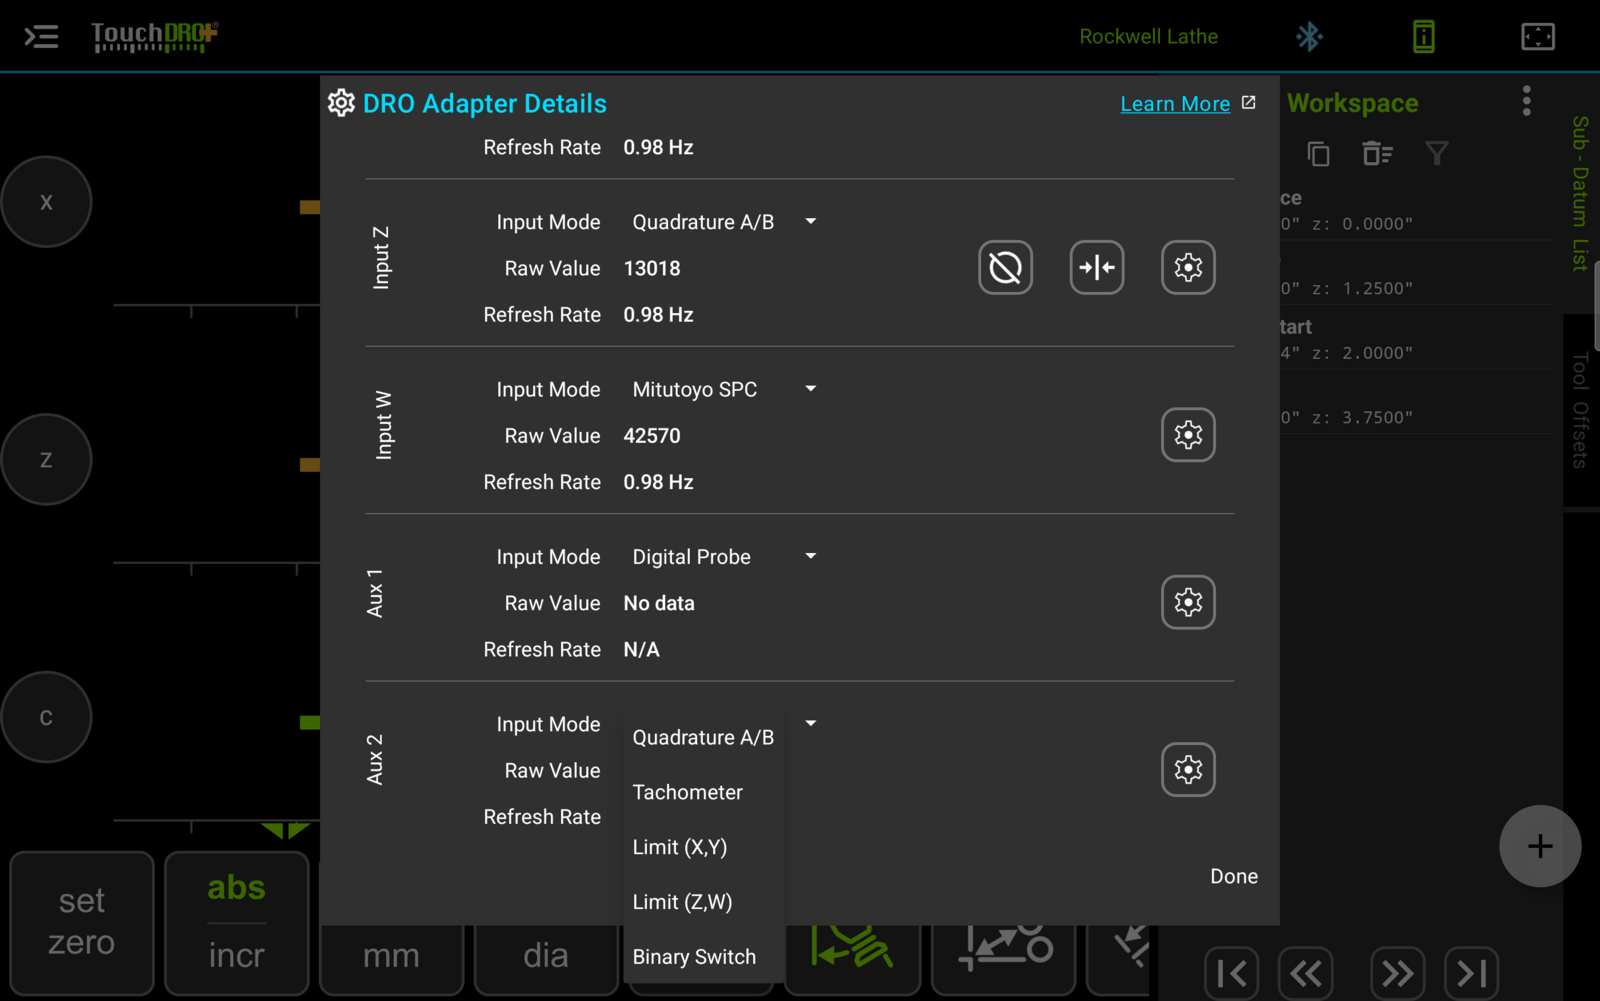
The available aux modes are:
- Digital Probe: reads a touch probe or edge finder connected to the input.
- Tachometer: reads an RPM sensor and feeds the spindle-speed readout.
- Quadrature A/B: turns the aux input into an additional single-ended quadrature counter, the same as a scale input. This is how you add a counter beyond the standard scale inputs.
- Limit (X,Y) and Limit (Z,W): wire the aux input for two limit switches, one per listed axis. When a switch is pulled to ground, the count for that axis is reset to zero, the same as tapping the reset button next to that axis on the main screen.
- Binary Switch: reads a plain on/off switch on the input.
The gear button on an aux input opens the settings for whatever mode that input is in. An input in Digital Probe mode opens "Probe Input Settings"; one set to Tachometer opens "Set Pulses per Revolution", where you tell TouchDRO how many pulses the sensor produces per turn of the spindle.
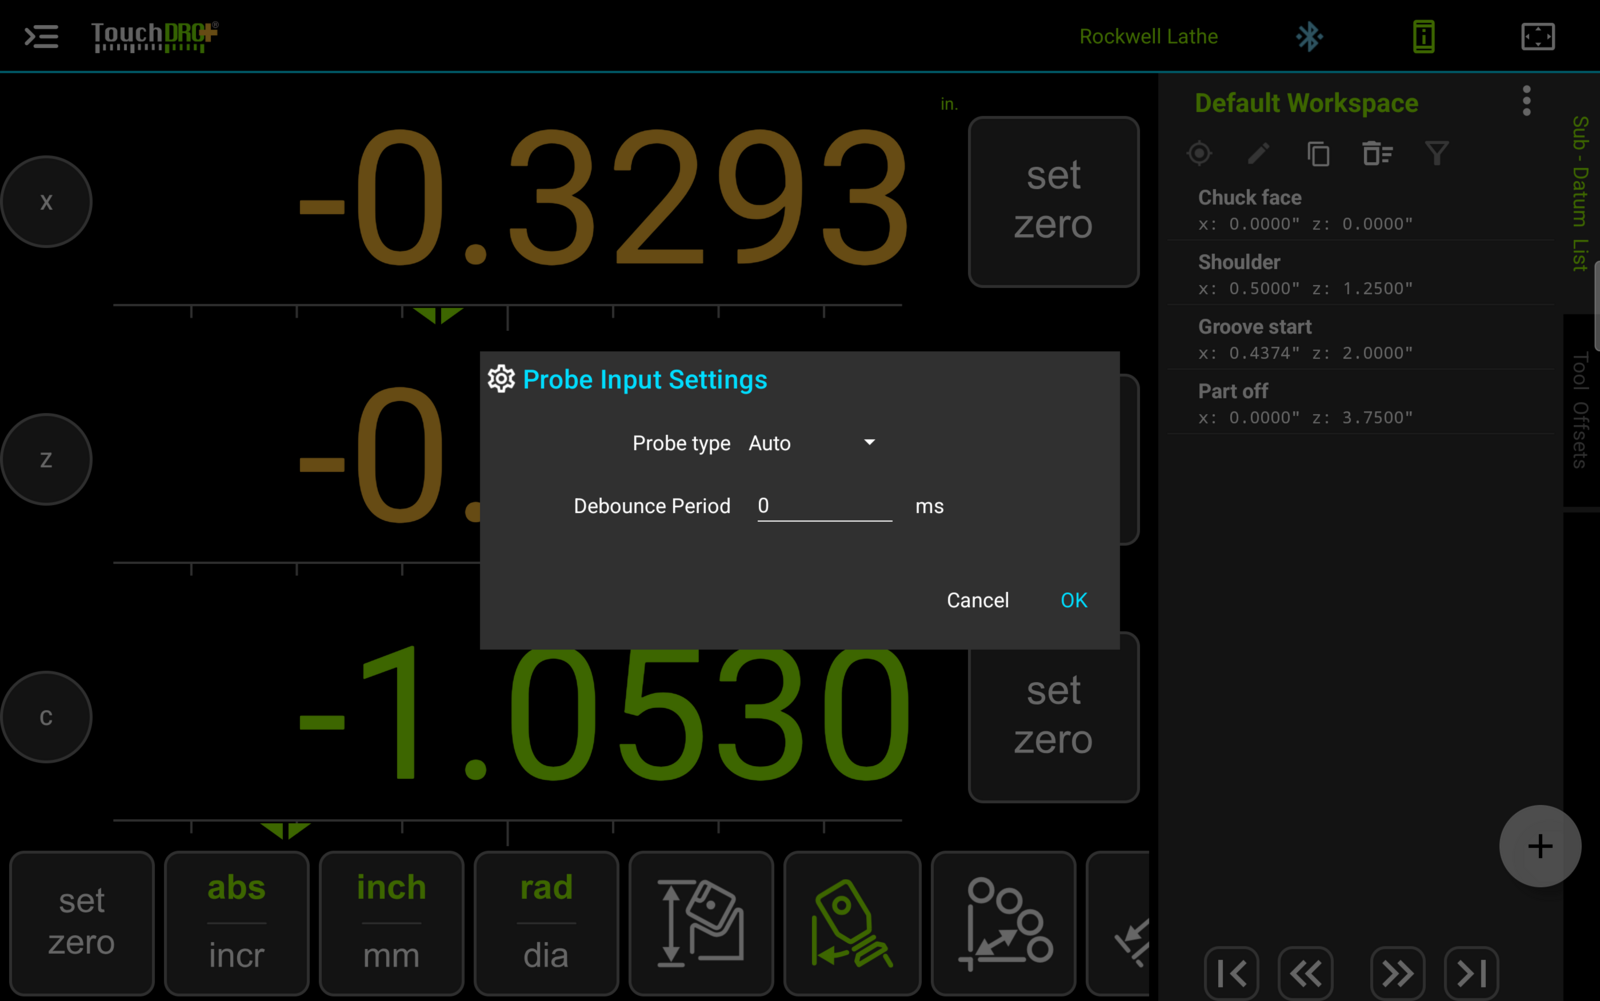
"Probe Input Settings" holds two controls: the probe type, and a debounce period in milliseconds that ignores contact bounce after the probe triggers.
Applying Changes
Saving an input or aux mode change records it, but the adapter keeps running its previous configuration until it restarts. Nothing actually changes until then. When you have a saved change waiting, an orange banner appears at the top of the dialog with a "Restart Now" button.
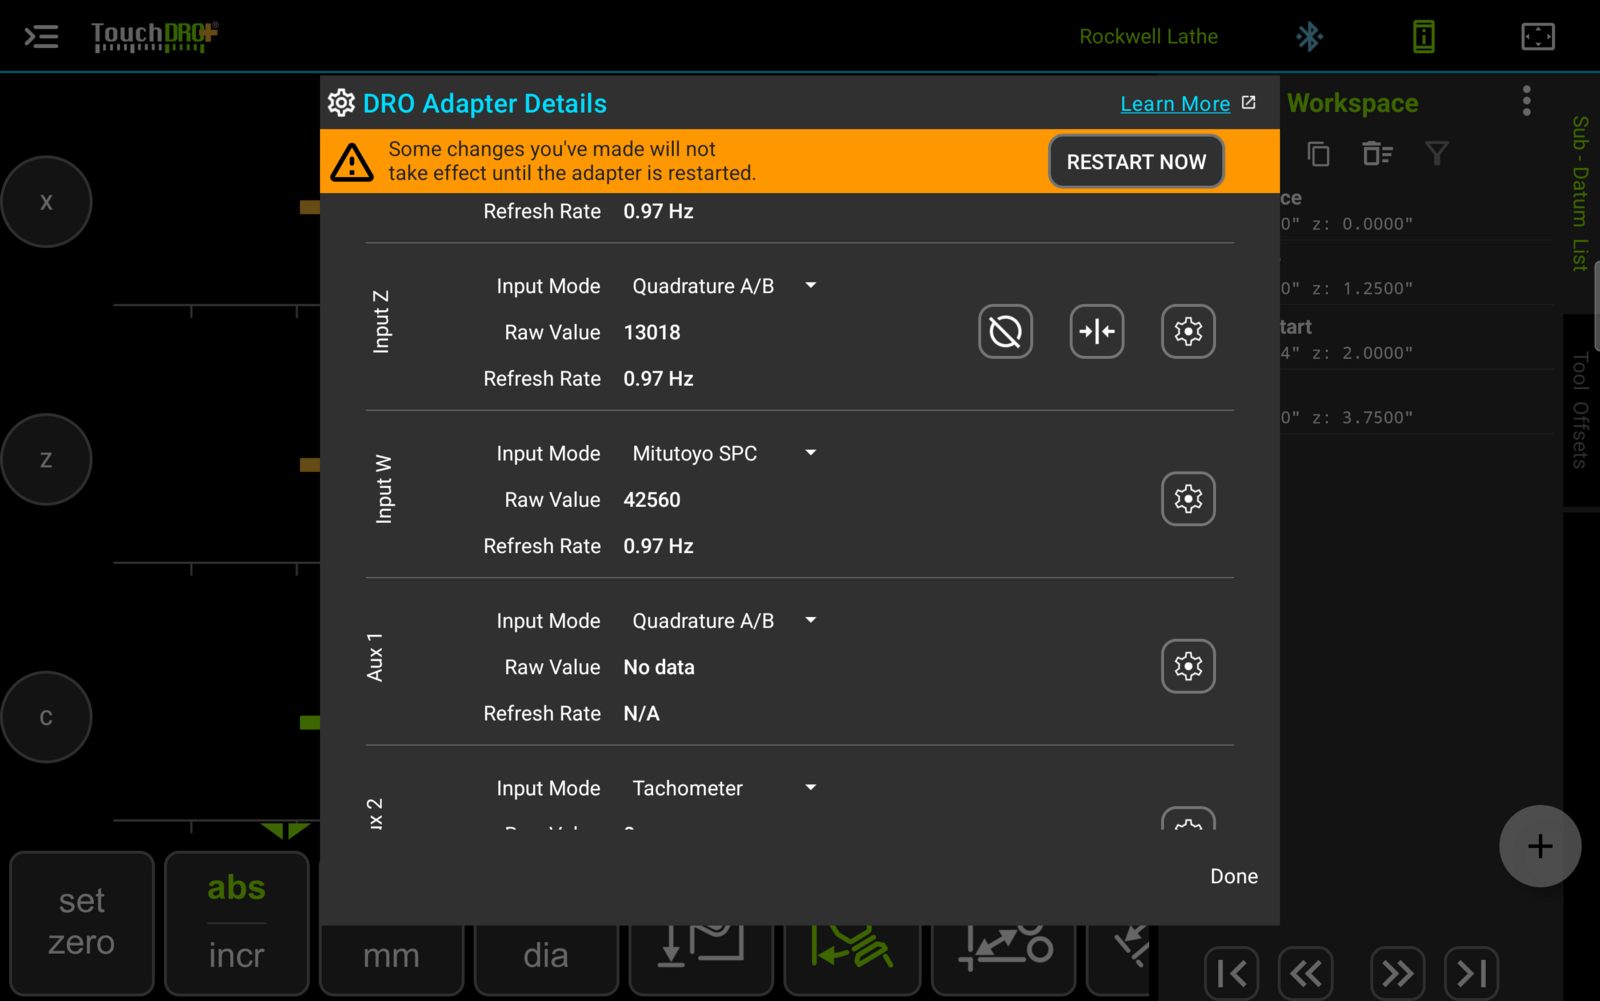
Tap "Restart Now" to reboot the adapter. The application loses its connection while the adapter restarts, then reconnects on its own after 20 to 30 seconds. Once it reconnects, your changes are active and you can close the dialog.
Closing the Dialog
The Done button closes the dialog. Saved mode changes are kept and take effect on the next adapter restart; any change you did not save is discarded.
Once each input's protocol matches its scale and the aux inputs are set for whatever you have connected, this dialog mostly serves as a quick health check. Open it, glance at the raw values and refresh rates, and confirm every input is counting.