
Creating an Error Map
Almost every DRO scale, regardless of its price, carries some amount of non-linear error. On glass scales it is usually small or negligible, even at the budget end; on magnetic scales it is much more pronounced. Correcting this kind of error normally means calibrating the scale against a laser interferometer.
TouchDRO can use a glass scale instead. Record the magnetic scale against a temporarily mounted glass reference, and TouchDRO will turn the difference between the two into an error correction map. As long as both scales are repeatable, the correction can significantly improve the magnetic scale's accuracy.
This page covers the recording procedure and how to read the results. What a map is, the map editor, and the file format are covered in the "Error Correction and Backlash Maps" page; for the broader story of checking a magnetic scale's accuracy before deciding to map it, read the magnetic scale accuracy guide.
How It Works
While you crank the axis back and forth, TouchDRO records both scales together and computes where the target scale disagrees with the reference. The disagreement that shows up in the same place on every pass is the scale's real error, and that is what goes into the map.
The recording works in raw encoder counts, before calibration is applied. This has two practical consequences: the positions on screen are counts rather than inches, and recalibrating the axis resolution later doesn't invalidate the map. The map belongs to the input on the adapter, not to a machine profile, so it corrects the scale on every machine profile that reads it.
Two kinds of error are deliberately left out of the map. A uniform scale-factor error, where the scale reads a consistent percentage long or short, is a resolution calibration job; TouchDRO measures it, removes it from the map, and reports it separately. Lost motion on a change of direction is a backlash job: the map has no direction input, so it cannot correct an error that depends on which way the axis is moving.
Choosing a Reference Scale
The reference can be any position source you trust more than the scale being mapped. Its resolution should be as fine as the target's, or finer. A coarser reference doesn't just add noise; it physically cannot see structure smaller than its own step, so a 5 micron reference will simply miss 1 or 2 microns of real error in a 1 micron target. Mapping a 1 micron scale against a 5 micron reference is only worth doing when the target is in very rough shape.
The reference doesn't need to be calibrated, and its resolution doesn't need to match the target's: a uniform difference between the two scales is factored out automatically.
Ideally, the reference should cover the axis's whole travel. Anything the passes don't reach is left uncorrected, since the map holds its last correction flat beyond its end points. When a long enough reference isn't available, the axis can be mapped in sections, as described below.
When the Reference Scale Is Shorter
Sometimes the scale that needs mapping is longer than the longest reference you own. For example, it's common to put a magnetic scale on the X axis of a mini mill to preserve as much of the limited Y travel as possible; the other two axes easily fit glass scales, but those scales are shorter than the table's travel.
In that case, build the map in sections. Clamp the reference scale parallel to one part of the travel, and build, save, and export a map for that part as usual. Then move the reference to the next part, again keeping it as close to parallel as possible, and create a map for it the same way.
Use a spreadsheet to join the exported files, remove the overlapping entries so that each position appears only once, and import the combined file back through the map editor. The positions in a map are absolute encoder counts, so the sections only line up if the target axis is never re-homed or re-zeroed between them: every section has to be recorded against the same zero point.
Checking the Reference Scale
Your glass scale can carry a little non-linear error of its own, and when it does, it is usually of very low frequency: a slow drift over many inches of travel rather than a ripple. Before trusting a reference, you can estimate its contribution visually with a reversal check.
Record one pass, as described in "Recording Passes" below. Then reverse the reference scale end for end, co-zero it with the target at the home position, and record a second pass. Reversing the scale flips its own error end for end while the target's error stays where it is, so any error that belongs to the reference shows up as disagreement between the two passes.
Press "Review Map" and compare the two lines. If they coincide, the reference isn't contributing any error worth worrying about. If they slowly diverge from one another, the reference has pronounced error of its own, and the map it produces will carry a share of it.
Discard the session after the check. Building a map relies on the reference staying put for every pass, so the passes recorded on either side of the reversal must never be combined into one.
Setting Up
Mount the reference scale parallel to the scale being mapped, clamped firmly enough to survive several passes without shifting. Check that the reading head moves freely over the whole travel without binding, and that the cable is strain-relieved and doesn't drag on anything. These three points decide the quality of the whole recording: a shifting clamp ruins repeatability, and a dragging cable puts large, unrepeatable error straight into the data.
Connect the reference to a free adapter input and enable it: in its encoder settings, set the measurement mode to "Linear".
Home the target axis before recording. Reference it to a designated reference mark using the reference-mark routine if the scale has one, or hard-zero it at a durable home position from the "DRO Adapter Details" dialog. The map will be tied to this zero, and the axis has to be re-homed to it whenever the adapter loses power, as described in "Establishing a Repeatable Home Position".
Zeroing the reference at the same spot is optional. TouchDRO measures and removes the constant offset between the two counters on its own, so co-zeroing changes nothing in the map; it just makes the two live readouts easier to compare on screen.
One rule holds from the first pass until the map is saved: nothing about the reference may change. Don't move the clamp, don't re-zero it, don't power it down. For the same reason, don't re-reference or re-zero the target axis mid-session: the recorded positions are absolute counts, and passes recorded on either side of a re-zero are in different coordinate frames that cannot be combined.
Recording Passes
To open the recorder, open the input's encoder settings, press the button on the "Error Map" row, and then press the wand button in the editor's header. This opens the "Record Scale Error" dialog. Choose the reference scale's input in the "Reference input" dropdown, then move the axis and check that both "Position" readouts follow it. When no other input on the adapter is reporting, the dialog will say "No other input reporting"; connect and enable the reference scale first.
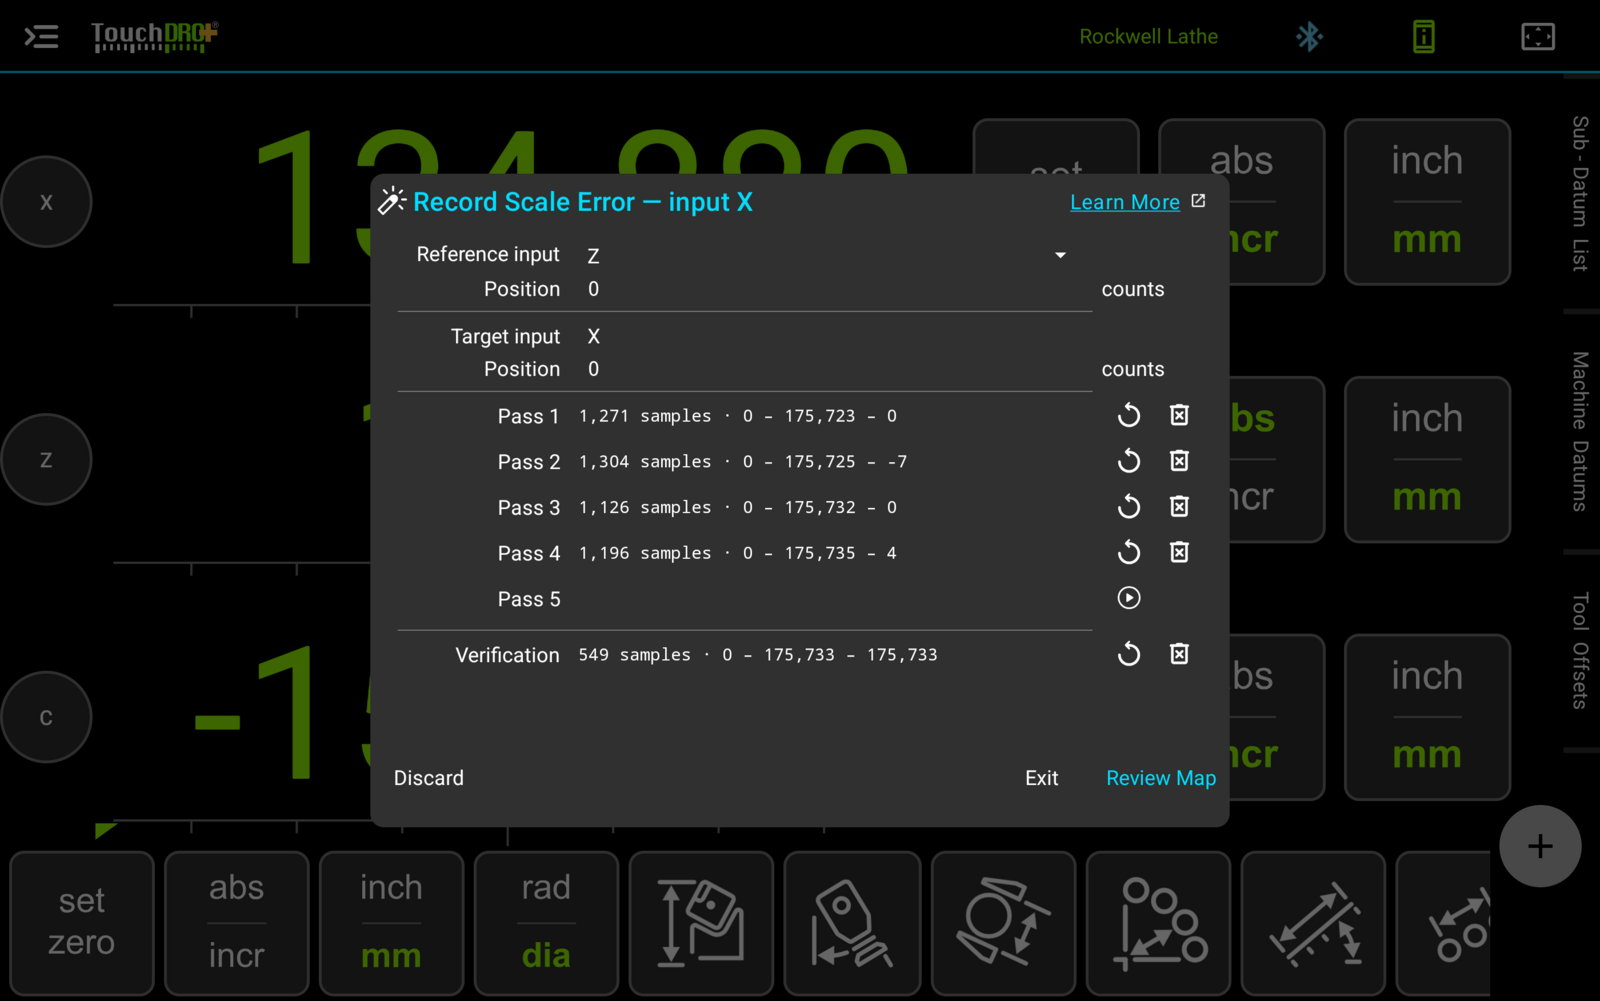
A pass is one trip over the axis's travel, recorded as a unit:
- Crank the axis to the start of the travel you want mapped, short of the hard stop
- Press the play button on the next empty pass row
- Crank the axis to the far end of the travel and back, smoothly and steadily
- Press the stop button
A round trip out and back is one pass, not two. Don't stop the recording at the far end and start a new pass for the return leg: splitting round trips into one-way passes badly degrades the map, and nothing on screen will warn about it. A one-way pass is legitimate, and costs no accuracy against a round trip over the same travel, but only a round trip lets TouchDRO measure how much the readings depend on direction.
Crank smoothly, at a steady pace of roughly an inch every two to four seconds. The display counts the distinct samples collected as you go; 50 to 100 samples per inch is a good target. Smoothness matters more than speed: the adapter reports 20 to 25 readings per second regardless, so cranking slower buys more samples, but vibration or jerky motion puts noise into the data that no amount of density makes up for. Pausing mid-pass to reposition your hand is completely harmless.
Stay short of the hard stops at both ends. A magnetic reading head shoved against a stop can shift sideways and miscount, and error recorded at the extremes goes into the map like any other data.
A finished row states what it recorded: the sample count, then the start, farthest, and end positions, such as "1,271 samples · 0 – 175,723 – 0". The last number is where the pass ended, so a pass that didn't come back to its starting count, reading something like "0 – 175,725 – -7", is visible at a glance; if the clamp shifted or counts were lost, redo the pass with the restart button. A row that paired no readings at all says "No paired readings". The restart button re-records a row immediately, and the delete button empties it after asking.
"Review Map" is enabled after the first pass, and saving needs two. TouchDRO only trusts error that shows up in the same place on every pass, so a single pass can produce only an in-sample estimate, and the "Save Map" button stays disabled until a second pass backs the map up. Five passes is the maximum, and passes beyond the third mostly sharpen the "Repeatability" figure on the review screen. Every pass should cover the same travel: a stretch that only one pass reached has nothing to be cross-checked against, and the map is only as good as its thinnest coverage.
The recorder has three ways out. "Review Map" builds the map from the recorded passes and opens the review described below. "Exit" closes the dialog and keeps the recorded passes: when you open the recorder again, TouchDRO will ask "A recovery file from the last calibration was found. Use it?", and answering "Yes" restores them. "Discard" deletes every recorded pass after asking.
The Verification Pass
The verification pass is optional, but recommended. It is recorded the same way as a numbered pass, on its own row, and a one-way trip is enough. TouchDRO holds it out of the map entirely: when the map is built, the verification pass is scored against it, which gives a real-world estimate of how much error will remain once the map is applied. Because the map never saw this data, the estimate is honest; scoring the map on the same passes it was built from would always flatter it.
Reviewing the Results
To build the map and see the results, press "Review Map". TouchDRO will show "Building the map…" while it computes, then open the "Scale Error Review" dialog. The dialog states five figures, all in encoder counts. "Raw error" is the error measured across the recorded passes, stated as its worst-case low and high over the travel rather than a symmetric band. "Expected error" is the estimate of what will remain once the map is applied, computed on readings held out from the fit, so the figure is honest rather than flattering; with a single pass there is nothing to hold out, and the label reads "Expected error (in-sample)" to say so. "Improvement" is the ratio of the two.
"Repeatability" states how closely the scale reproduces the same reading from pass to pass, and reads "Not measured" until two passes share ground. "Verification" is the residual error actually measured with the map applied; it reads "Not recorded" without a verification pass, and "Nothing to measure" when the pass was too short to score. When "Verification" and "Expected error" roughly agree, as they do in the screenshot below, the estimate can be trusted. A "Zero at" line appears when the recording never crossed the axis's zero count, and names the position where the map's correction is pinned at zero.
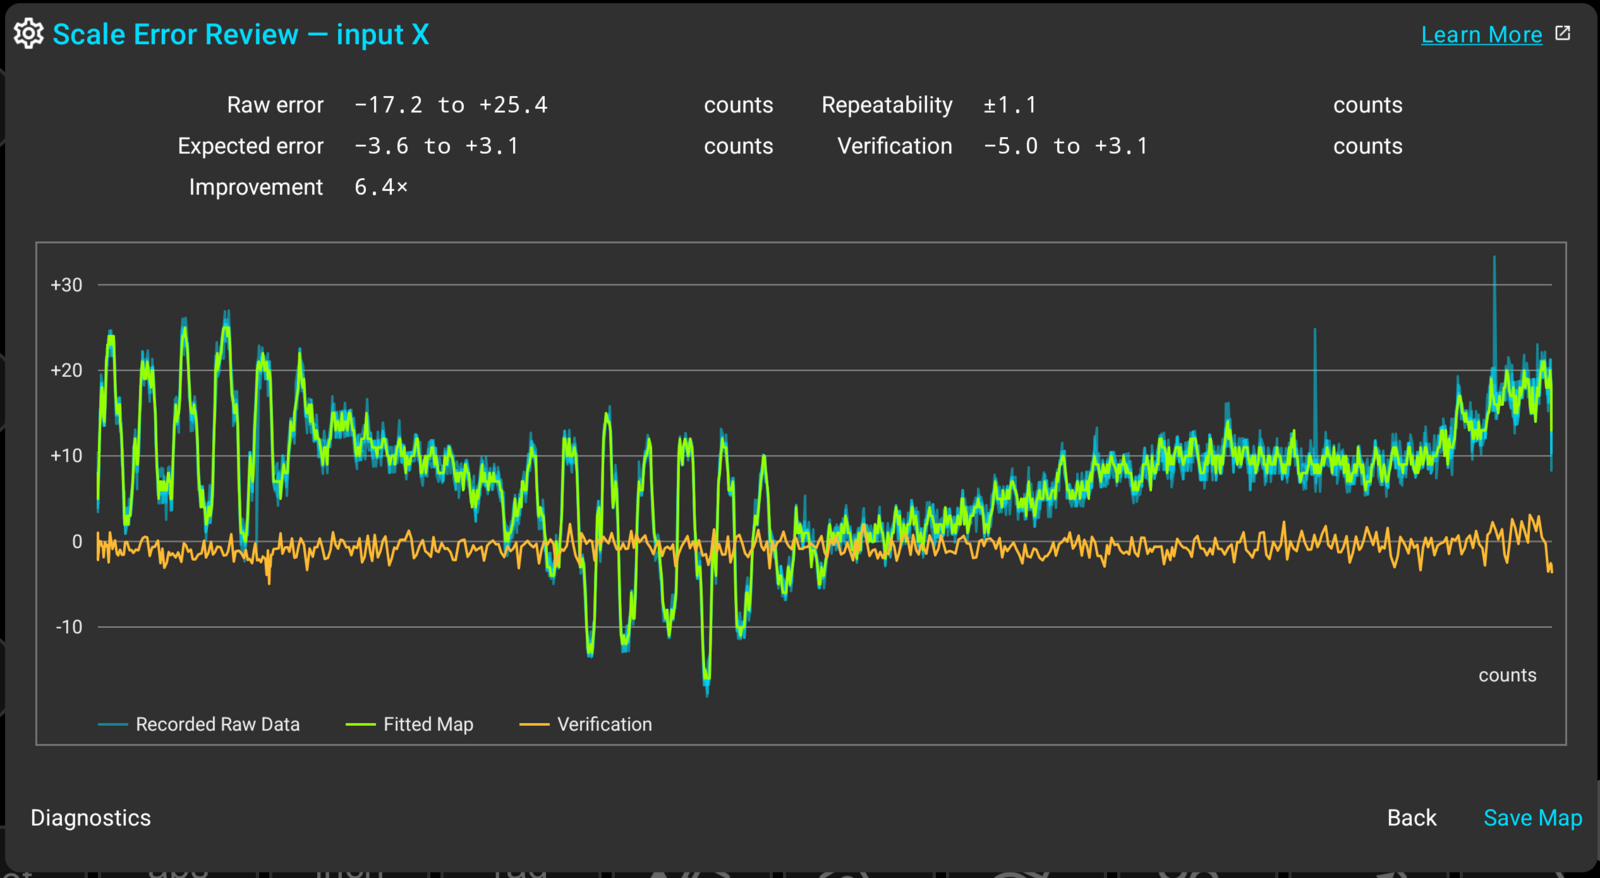
The plot draws three series. "Recorded Raw Data", in blue, is every recorded pass: the difference between the target and the reference, plotted against position. "Fitted Map", in green, is the correction curve the map will store. "Verification", in amber, is the verification pass with the map applied. To show or hide a series, tap its legend entry; the plot rescales to what is visible, so hiding the others lets you inspect one trace at its own scale.
Reading this plot is how you judge the recording, and the map:
- The blue lines stacking into one thick line means the error repeats, and the map will remove it. That stack is the shape of your scale's real error
- A blue line that wanders away from the stack means something moved during that pass: the clamp, the cable, or the work holding the reference
- The spread between the blue lines is the floor. No map can correct the scale below the level at which it repeats
- The green line riding the middle of the blue stack means the map captured the error that repeats. It stays smooth through the noise on purpose, since noise is exactly what it must not chase
- The amber line is the error that will actually remain: the verification pass, corrected by the map
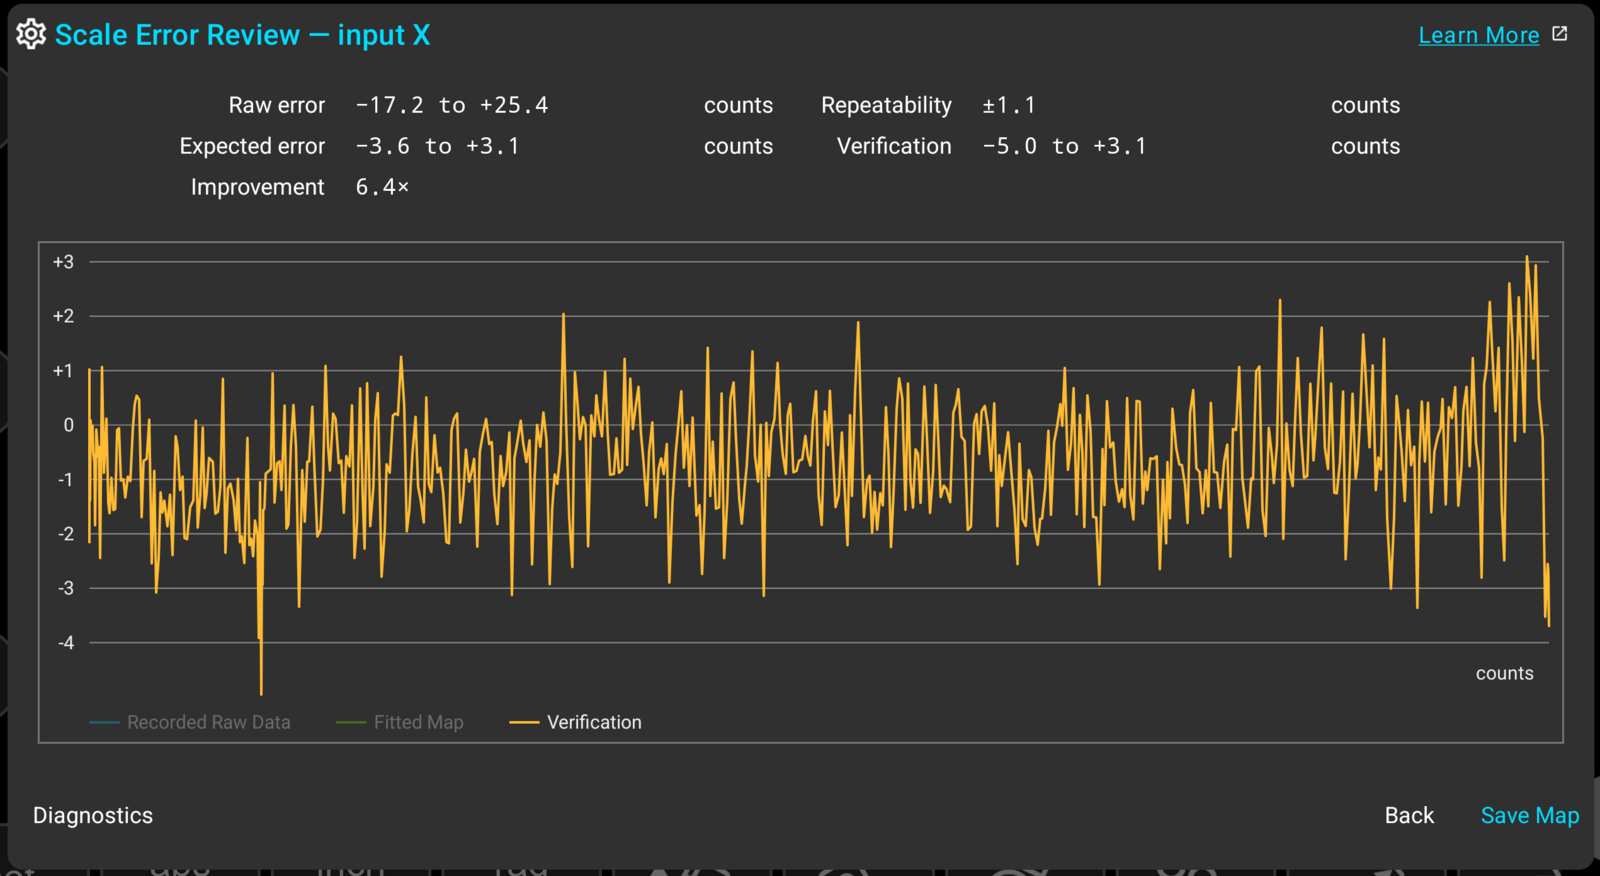
TouchDRO doesn't grade the map, because "good enough" depends on what you make. It refuses to save in exactly one case: when correcting with the map would leave more error than leaving the scale uncorrected.
To write the map to the input, press "Save Map". "Back" returns to the recorder with the passes intact, to record more before deciding.
Diagnostics
To see everything TouchDRO knows about the run, press "Diagnostics" on the review screen. The dialog exists for asking for help: the "Copy" button puts the whole report on the clipboard, ready to paste into a forum post or an email when a recording looks wrong.
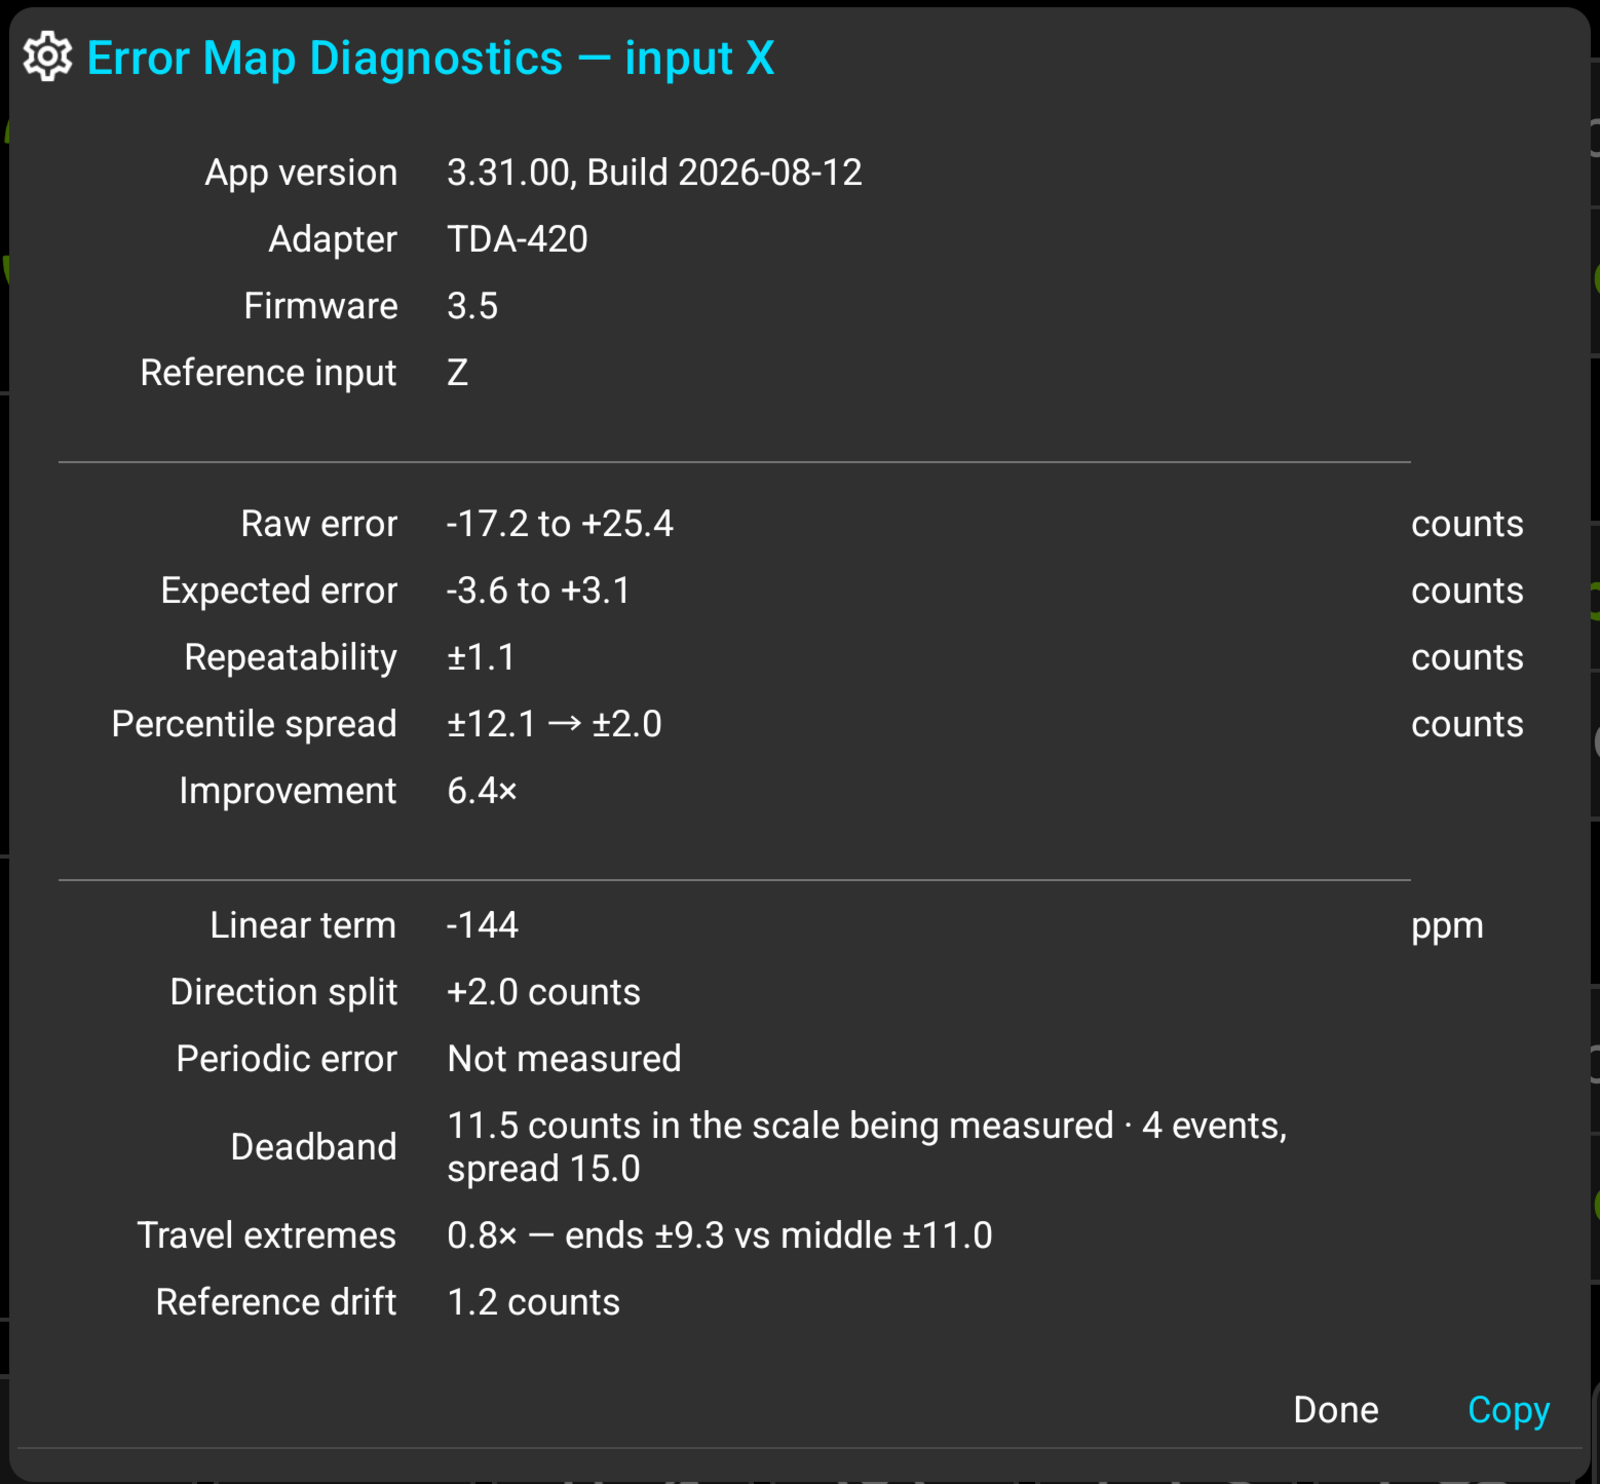
The top block records the conditions: the application version, the adapter model and firmware, and which input served as the reference. Below the review's own figures, these lines appear only here:
| Line | What it means |
|---|---|
| "Percentile spread" | The raw and corrected error restated as ± half-widths, the way a tolerance is stated |
| "Linear term" | The uniform scale-factor difference between the target and the reference, in parts per million. It is reported, never folded into the map |
| "Direction split" | The disagreement between the two directions of travel at the same position. It points at lash or a flexing mount, and the map never corrects it |
| "Periodic error" | The dominant repeating pattern found in the error, when one was detected. On a magnetic scale the period is typically the pole spacing of the tape |
| "Deadband" | Lost motion detected in the scale being measured on changes of direction, with the number of events. No map can correct this kind of error |
| "Travel extremes" | The error at the ends of the travel compared against the middle. Ends much worse than the middle usually mean the passes ran into the hard stops |
| "Reference drift" | How far the reference disagreed with itself between passes. A shifted clamp shows up here |
| "Verification offset" | The constant offset between the verification pass and the map's prediction |
| "Glitches dropped" | Readings the capture rejected as physically impossible: an excursion far larger than the axis was moving that reverts on the very next sample. Zero is normal; a climbing number points at a cable or a connector |
A line reads "Not measured" when the recording lacks what that statistic needs. A deadband needs a reversal with a settled deficit, reference drift needs two passes over common ground, and the verification offset needs a scored verification pass. It is a statement about the data, not a fault.
The bottom block describes the recording and the map it produced: the number of map points and their spacing, the reading counts, the count the map is anchored at ("Zero at"), how the expected error was scored, whether the capture hit its limit ("Capture truncated"), and one line per pass with its readings, span, and closure. A pass whose closure is not zero didn't return to its starting count, and a one-way pass shows a dash in place of its closure, since a pass that never came back has nothing to close.
One line deserves a warning. The "Linear term", in parts per million, is a ratio between two scales rather than an error in either one whenever the reference is uncalibrated. A 5 micron reference against a 1 micron target reads about 800,000 ppm on a setup that is perfectly fine. Don't recalibrate an axis from this number.
Warnings and Messages
TouchDRO flags data it can prove invalid; it never grades whether a map is good enough for your work. Four notices can appear in the review's banner:
| Notice | What it means |
|---|---|
| "Correcting with this map would leave more error than leaving the scale uncorrected." | The recording didn't capture a repeatable error. This is the only notice that disables "Save Map"; follow its advice and record again, more slowly, or with the reference clamp checked |
| "The reference disagrees with itself by N counts between passes, against M counts for the scale being measured." | The reference moved during the run. Re-clamp it and record again |
| "The scale being measured does not resume counting for about N counts after a direction change." | The target scale has a dead zone on reversal, and a map corrects by position only, so no map can remove it. The hysteresis setting is the tool for this error |
| "Recording hit its limit; later readings were not kept." | A capture hit its sample ceiling. The map is built from what was kept, and "Capture truncated" in the diagnostics names the affected run |
When the recorded passes fit no map points at all, the figures are replaced with "Not enough data to build a map." Saving is disabled, and "Diagnostics" stays available for working out why.
When restoring an interrupted session, TouchDRO checks that the saved reference input is still reporting. If it isn't, a warning names both inputs and asks you to reconnect the original before recording more passes; appending passes recorded against a different reference silently corrupts the whole run.
Troubleshooting a Bad Recording
Almost every bad recording announces itself on the review plot as blue lines that refuse to stack. In the screenshot below, the passes sit tens of counts apart, "Repeatability" reads ±17.3 counts against ±1.1 for the recording in Fig. 2, and the map can only promise a 1.8× improvement: the spread between the passes is the floor, and the floor has eaten the correction.
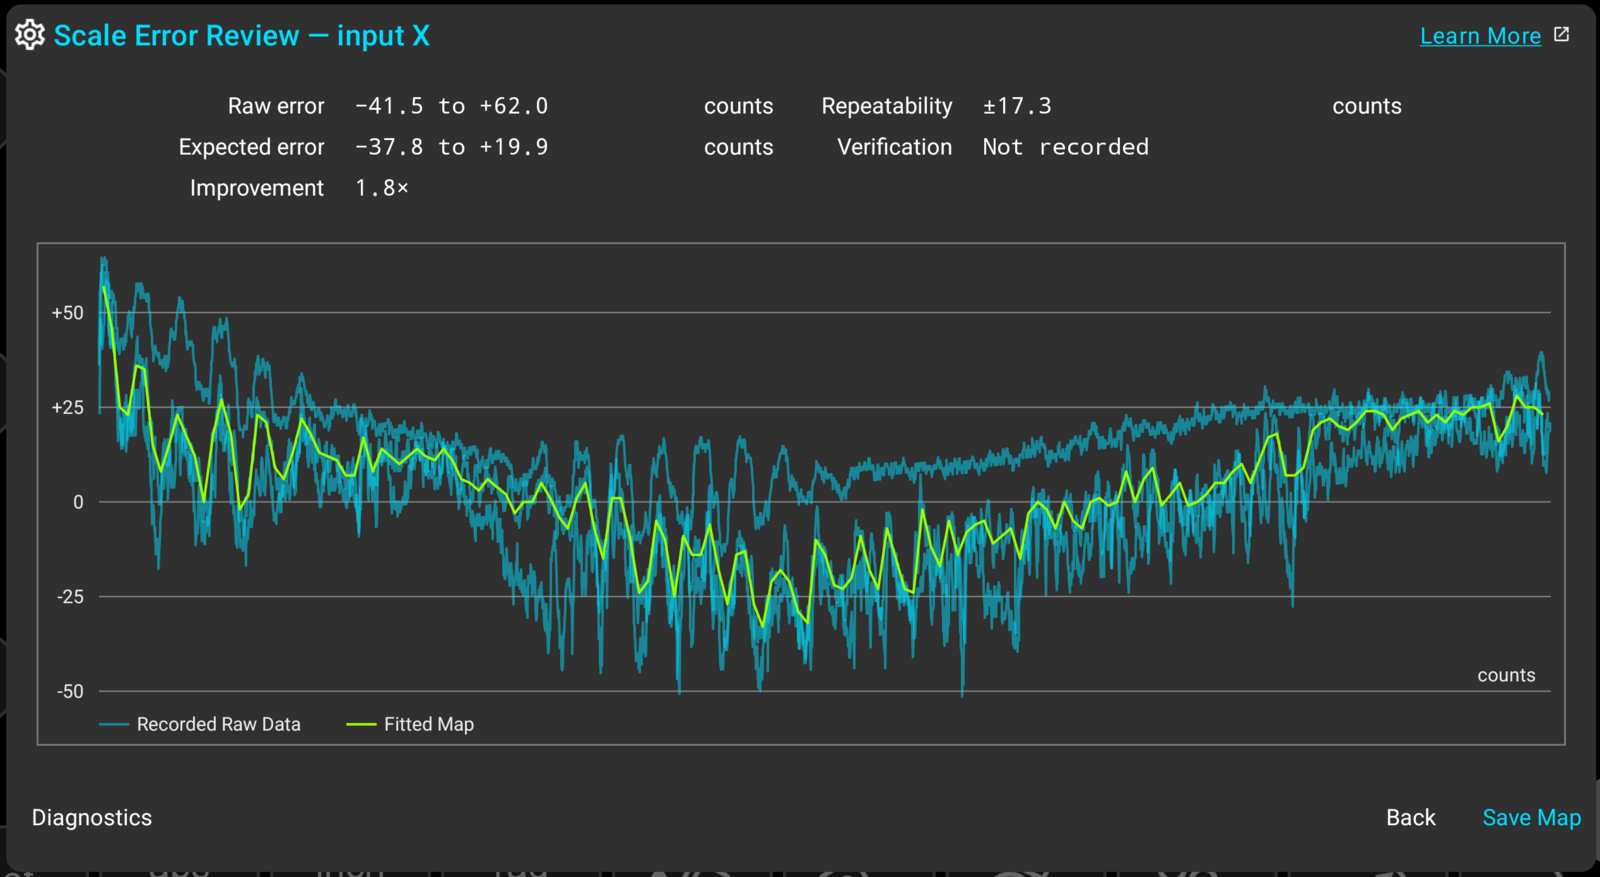
What moved is the question, and these are the usual suspects, roughly in order of how often they bite:
A dragging or strained cable produces large, erratic error that lands somewhere different on every pass. Route the reference's cable so that nothing pulls on the reading head anywhere in the travel.
A loose reference clamp shows up as poor repeatability: the overall shape may look plausible, but the passes sit visibly apart from each other. Re-clamp and re-record; the data can't be salvaged.
Vibration puts dense noise into the affected stretch of the recording. Power feed is a common source, and the vibration can be position-dependent, appearing only where the machine happens to resonate. When a stretch of the plot looks fuzzy on every pass, record by hand at a steady pace instead.
The "Lessons Learned" section of the magnetic scale accuracy guide walks through these failures on real recordings.